Showing posts with label Artfully sent. Show all posts

Friday, 24 July 2020

Colour Dare #404 Tic-Tac-Toe

#CTMHVandra, celebrate, Birthday, happy birthday, Colour Dare Challenge, color dare, cricut, Artfully sent, TicTacToe, #ctmhHappiestPlace,


Our Colour Dare Challenge for #404 is Tic-Tac-Toe. Black, White, and Neutrals are free to use. You are invited to participate in this challenge too. Go to the link for Colour Dare #404 and add your entry. These are the colours from the Happiest Place Product Bundle.
#CTMHVandra, celebrate, Birthday, happy birthday, Colour Dare Challenge, color dare, cricut, Artfully sent, TicTacToe, #ctmhHappiestPlace,
I made a card for a 16 year old friend for his birthday. I used the Cricut® Artfully Sent Digital Collection to cut the outline of the card. I reduced the size from recommended 7 inches to 5.5 inches so it would be closer to the cards and envelopes size. I used an envelope to put the finished card in White Cards & Envelopes Value Pack.


I used all the coloured cardstock as per the Tic-tac-Toe board with the card cut using Sapphire Cardstock and the middle added white to it and stamped in Sapphire Exclusive Inks™ Stamp Pad on the B the number 16. 

I also cut a bike from grey cardstock from the Artfully sent collection and stuck it inside the card to give a pop out style card (I hope the video works). The boy that received the card, rides in State competition level at the velodrome so it was a nod to that. The silver L in Celebrate was using Silver Shimmer Trim. So there is a seam. I couldn't find my silver glitter paper. 

The Saffron and nectarine cardstocks turned out looking very similar in my photo. It was very hard in the lighting to get all the colours to look correct. Too much light washed them out and too little light made some of the colours darken. 

To create your own customised cardstock pack you can log onto my consultant website and order a 12 pack or 24 pack of cardstock of your choice. This is so good to order. Minimum of 2 sheets of each colour. check out here the two options. So good!!
#CTMHVandra, celebrate, Birthday, happy birthday, Colour Dare Challenge, color dare, cricut, Artfully sent, TicTacToe, #ctmhHappiestPlace,

Lets hope my video works to see the card pop. 


Thanks so much for dropping by to check out my latest project. Hope you can join in the Colour My Heart Color Dare Challenge #404 too. I'm really interested to hear what you think about my card, so I'd love you to leave a comment. See you again soon. If you don't have a Close to My Heart Consultant (and you're in Australia) feel free to contact me either on this blog or via my website HERE. 
Vandra Stenton, Close to My Heart Consultant, Perth Western Australia

Friday, 23 January 2015

Wrapping Paper

I am excited to share some cool wrapping paper and a card that I made this week for my nephews 5th birthday. I love this idea of having an endless variety of personalised wrapping paper.

I bought some cheap brown paper on clearance after Christmas at a big chain store for $1 per roll which is 7m x 70cm wide. I bought 5 rolls and then went back and bought a few more cause I want to be able to do this for every gift I give. You can't probably get it that cheap at the moment but keep an eye out, lots of places do sell it and places like Ikea sell white paper on a role too.

I decided to let my daughter (who is a mad keen stamper) do the wrapping paper while I worked on the card. I set her up with the Fast and Furious stamp set (she choose which vehicles she wanted to use and which colours).
This stamp set is such a fabulous set for young boys (and the young-at-heart boys). My daughter chose Cranberry Exclusive Inks™ Stamp Pad, Lagoon Exclusive Inks™ Stamp Pad and Honey Exclusive Inks™ Stamp Pad. She then random stamped all over the paper, which we had cut to size of the present by loosely wrapping it around the present first. 

Note: When getting my 6yr old to stamp I put the cars on the 3x3inch block and then realised that putting them diagonally on the block meant she was able to stamp more evenly than if the cars were at one edge of the block.


I started the card by deciding to make a Pop-Up card from the Cricut® Artfully Sent Cartridge.
On page 28 there is a pop up card that is designed to have the little aliens on it. I just cut the pop-up insert at 5 inches with the shift key on (as per the instructions) but did not cut the aliens :)


I picked a blue cardstock from my pile of Whimsy Cardstock Combo Pack and cut out the pop up design. To follow with the recycled brown paper look I chose 12" X 12" Kraft Cardstock to create the outside of the card and stamp the three matching vehicles as my daughter had chosen for her paper. 


In the centre of the paper and the centre of the card I stamped my nephews name in Urban Alphabet font stamps and Black Exclusive Inks™ Stamp Pad.

 After I had stamped on the front of the card with the same colours as the wrapping paper, I stamped one set on scrap Kraft Cardstock and cut them out, leaving the bottom of the cut out stamps fairly flat for the pop-up. 

 I stuck on the vechicles on the pop up sections of the card with 3L® E-Z Dots® Adhesive and used that same adhesive to stick the insert down to the outer card.


I was very happy with the finished product and think that it made a nice co-ordinated personalised gift wrapping. I hope I have given you some inspiration for your next gift giving opportunity.

I was originally inspired to make wrapping paper when a friendly sister consultant Laura Beacham shared some cute paper she had made with a matching card using the cutest Love Ya Silly stamps and the Operation Smile Fundraiser stamp set You're the Bomb to make the balloon (turning the bomb upside-down). She used the paper Paper Fundamentals Adventure Assortment and 12" X 12" Black Cardstock with Honey Exclusive Inks™ Stamp Pad and Black Exclusive Inks™ Stamp Pad.

Thanks Laura for permitting me to show your cute work on my blog, I love your little cute party alien/monsters.


Made by Laura Beacham - used with permission.

Made by Laura Beacham - used with permission.

Friday, 9 January 2015

Blogging once a week & Kindness

So one of my goals for 2015 is to do some blogging on my business every week. I am going to highlight ideas, showcase products, give you something every week to get you inspired in your own projects. I am not going to pick a specific day cause I don't want to give myself too much pressure but a few days grace either side! This is my second week of blogging and my third post of the year. I'm on track so far. I hope I can keep it up.

So this week I'm going to highlight something really nice you can do for a friend as part of a #365daysofkindness idea (see my sisters Blog http://365days-of-kindness.blogspot.com.au/) or her 365 Days of Kindness Facebook Page that I help administer for more kindness ideas.

One thing that is nice to do is to send a friend a card, saying "thanks" or "Happy Birthday" or "I'm thinking of you".

Then for someone (as something extra special) you can send/give your friend a bunch of blank cards so they can send them on to their friends and family. Its a really nice way to pay it forward.

I did this for a friend as a gift recently. These are some of the cards I gave to her (I gave her 8 in total), some using older items from my stash, but you can get lots of them youself by checking my website in the "While Stocks Last" Section that is only available to purchase from my website www.vandra.ctmh.com.au. There is also a new "retiring soon" section of the online shopping section that shows items that are going to be retiring soon. You might want to check that out so you don't miss out on anything. I really enjoyed making these cards so I hope you enjoy seeing them. 

Have a Lovely Day card uses;
Colonial White Die-Cut Cards & Envelopes WSL
Party Washi Tape 3-Pack WSL
Pink Shimmer Trim
Lovely Birthday Stamp Set
with Crystal Blue Exclusive Inks™ Stamp Pad and Smoothie Exclusive Inks™ Stamp Pad
Paper Fundamentals Whimsy Assortment 
Junebug Puffies 
12" X 12" Colonial White Cardstock
3L® E-Z Dots® Adhesive


Hello card uses;
Colonial White Die-Cut Cards & Envelope WSL
This Moment – January 2015 Stamp of the Month with Black Exclusive Inks™ Stamp Pad
Washi Tape (retired but click link for current washi tapes)
Black Shimmer Trim 
Non-Stick Micro-Tip Scissors 
Round Sponge with Crystal Blue Exclusive Inks™ Stamp Pad
Staples regular sized because I temporarily couldn't find my Mini Stapler 


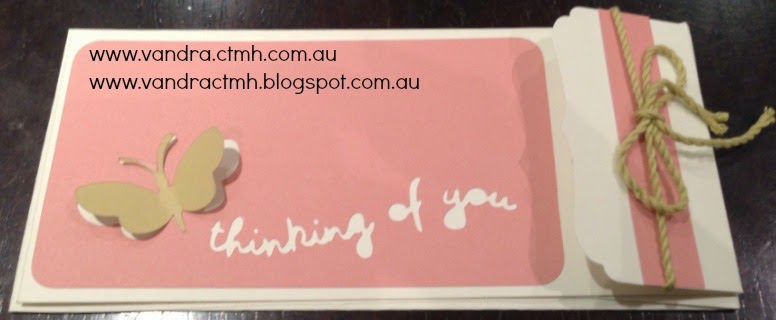
Long Thinking of You card uses;
Colonial White Die-Cut Cards & Envelope WSL
Cricut® Artfully Sent Collection 
12" X 12" Sorbet Cardstock  
12" X 12" Flaxen Cardstock 
SureCut™ Deluxe Craft Paper Trimmer  
Corner Rounder  
Flaxen Extra Thick Twine  
Bonding Memories™ Glue 
Memory Book Mini Glue Dots™   (to hold the bow in place)


 Thinking of You small card uses; 
Cricut® Artfully Sent Collection (cut out from previous card)
12" X 12" Sorbet Cardstock 
12" X 12" Colonial White Cardstock
12" X 12" Kraft Cardstock 
SureCut™ Deluxe Craft Paper Trimmer
Bonding Memories™ Glue
Purple Glitter Gems
Retired Chantilly Paper (see HERE for other patterned paper).  


Thanks for stopping by my blog. Please leave me a comment to let me know what you think of some of my latest cards and come back again soon!! Remember the fabulous specials in January 2015 (see previous blog post for details). If you have any questions on how I made these cards please ask and I will explain as best I can.
 

Thursday, 1 January 2015

This Moment - January CTMH Stamp of the Month Australasian Blog Hop

Hello and welcome to our Stamp of the Month Australasian Close to My Heart Blog Hop. We have all been creating with "This Moment" Stamp set. If you have arrived here from Lauren Moore- CTMH Craftings. Then you are in the right place. If you landed here by accident, no problem, please join in by following the link at the end of this post. Follow the links, check out all the amazing ideas and eventually you'll come right back to my page.
Today I would like to share with you my card which features the This Moment – January 2015 Stamp of the Month available exclusively throughout January for $27 or for just $5 when you spend $75. I've also included a bonus card for you to see.

I got excited for Christmas I got the Cricut® Artfully Sent Collection 
finally... so I wanted my Blog Hop creation to use the Artfully sent cartridge.

I started with a 12x12 piece of the Crystal Blue design Paper Fundamentals Whimsy Assortment.  I really love this paper pack!


 For my very first Artfully Sent Project I wanted to make something simple. I chose the tea-pot on page 18 of the booklet. I put the paper on the mat, loaded it, chose Sentiments and the "i" button and chose 5 inches then Cut... in a few minutes it was cut out! I didn't even use Cricut Craftroom on my computer. It was so quick and easy!


To finish off the card, I put a strip of Black Shimmer Trim (the length of the cut out heading) on a piece of 12" X 12" Crystal Blue Cardstock  underneath and glued it using Bonding Memories™ Glue to ensure all the bits of the teapot stayed stuck. Card Number 1 done in 5 minutes! Simple basic 5x7 inch card. Pretty happy with my first Artfully Sent Card.

Then I had the tea pot cutout left to make my Blog Hop Stamp of the Month Card out of... 

I embossed some White Daisy Cardstock at 5 x 3.75 inches with the Dot Embossing Folder. Then I used the Round Sponge (which I have cut into wedges to make it last longer) and sponged Crystal Blue Exclusive Inks onto the white cardstock to show up the dots a bit more.

I grabbed my value pack of 5 1/2" X 4 1/4" White Cards & Envelopes
and lined the edge of one of the white cards with Black Shimmer Trim which I cut in half lengthwise to stretch it further and placed the embosed white cardstock on top using my 3L® E-Z Dots® Adhesive. 

On a scrap of 12" X 12" Crystal Blue Cardstock  I stamped the HELLO from This Moment – January 2015 Stamp of the Month and then cut a dove-tail into it. I stamped the "I'm thinking of you" from the Cricut® Artfully Sent Collection stamp sets on some White Daisy Cardstock and backed it with Crystal Blue Cardstock dove-tailing both of their ends. With an extra piece of Black Shimmer trim also dove-tailed, to tie it together. Lastly I stuck on the tea-pot.

When I was packing up the cards after I photographed them, I popped the smaller card onto the larger card and I loved the look of it and thought if I was making another one I would make it larger just like this, with a double-mat.


Remember the Fun, Romantic, Friendly stamp set This Moment – January 2015 Stamp of the Month is only available throughout January from your Close to My Heart Consultant. 


Thanks so much for dropping by to check out my latest project.  I'm really interested to hear what you think about it, so I'd love you to leave a comment before heading off to the next stop on our Australasian Blog Hop,  Loretta's Creating Memories

See you soon!