Showing posts with label technique. Show all posts

Friday, 15 April 2022

Colour Dare #492 Tic-Tac-Toe In Full Bloom

#CTMHVandra, Colour dare, Birthday, cardmaking, stamping, cars, trucks, pop-up, road, stop, fun, technique, retired, commission,

Our Colour Dare Challenge for #492 is the colours of the In Full Bloom Scrapbooking Workshop Kit in a tic-tac-toe grid - Black, White and Grey are Free to use. When you are creating for more than one challenge please make sure your project meets our requirement. Most importantly - have fun!  Go to the link for Colour Dare #492 and add your entry. When you submit your entry you must provide a link to your post, not just to your blog in general. There are LOTS of ways to enter either a Blog Post or post to an online gallery (Facebook, Pinterest, SplitCoast Stampers, or Instagram).


I needed to make a card for a young boy in my local buy nothing group who I offered to make a card for so I chose colours suitable for a little boy turning 3. I chose the left hand side down with Lagoon CardstockSundance Cardstock and Lemonade Cardstock

I pulled out an old stamp set in my stash called Fast & Furious after Dad told me little Master 3yr old likes trucks and diggers. 

#CTMHVandra, Colour dare, Birthday, cardmaking, stamping, cars, trucks, pop-up, road, stop, fun, technique, retired, commission, B1288, Fast and Furious,
RETIRED STAMP SET

I also recently did some training with this style stamping as shown below. That was the inspiration for this weeks colour dare.
Its a fun technique where you stamp the white sections together to get the lovely split stamp. 
#CTMHVandra, Colour dare, Birthday, cardmaking, stamping, cars, trucks, pop-up, road, stop, fun, technique, retired, commission,
So I decided to do a multi-coloured version on a 6x6 sized card. I cut the Mink Cardstock into 6x12 and folded it as the base and this is my cutting guide. 

Mink - 6 x 12, 5 x 5, & 4.25 x 4.25
Lagoon - 5.75 x 5.75
Sundance - 4.75 x 4.75
Lemonade - 4x4 
(I probably should have done Lemonade a little smaller to fit the pattern better)

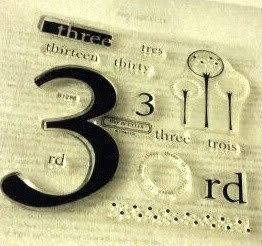
I used a tiny bit of adhesive to tack the coloured cardstock together and got my Black Exclusive Inks™ Stamp Pad and stamped the tucks and car OVER the edges. I also stamped the 3 from a retired set called Solo's we had B1288.

#CTMHVandra, Colour dare, Birthday, cardmaking, stamping, cars, trucks, pop-up, road, stop, fun, technique, retired, commission,
RETIRED STAMP SET

The idea is to stamp over the edges even though it creates a little section where the ink can't reach. This is covered later. 

#CTMHVandra, Colour dare, Birthday, cardmaking, stamping, cars, trucks, pop-up, road, stop, fun, technique, retired, commission,

Part of this technique is to stamp over the edges which leaves a little bit right next to each layer blank. That is the purpose of filling with the Mink layers later. 

#CTMHVandra, Colour dare, Birthday, cardmaking, stamping, cars, trucks, pop-up, road, stop, fun, technique, retired, commission,

I only used 3 vehicles because young boy was turning 3. Then put the non-stop fun stop sign in the corner. 

#CTMHVandra, Colour dare, Birthday, cardmaking, stamping, cars, trucks, pop-up, road, stop, fun, technique, retired, commission,
Close up shows the edges. Below shows how nothing much shows when you pull all the coloured sections apart. It all looks a mess but its a puzzle that works again when put together. 
#CTMHVandra, Colour dare, Birthday, cardmaking, stamping, cars, trucks, pop-up, road, stop, fun, technique, retired, commission,
Then I layered the Mink in between each of the layers and stuck them back together. 

#CTMHVandra, Colour dare, Birthday, cardmaking, stamping, cars, trucks, pop-up, road, stop, fun, technique, retired, commission,

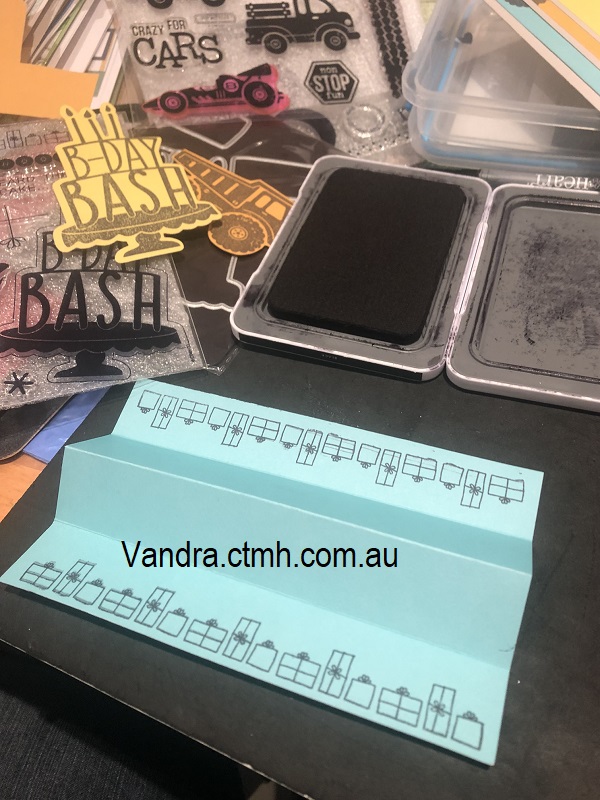
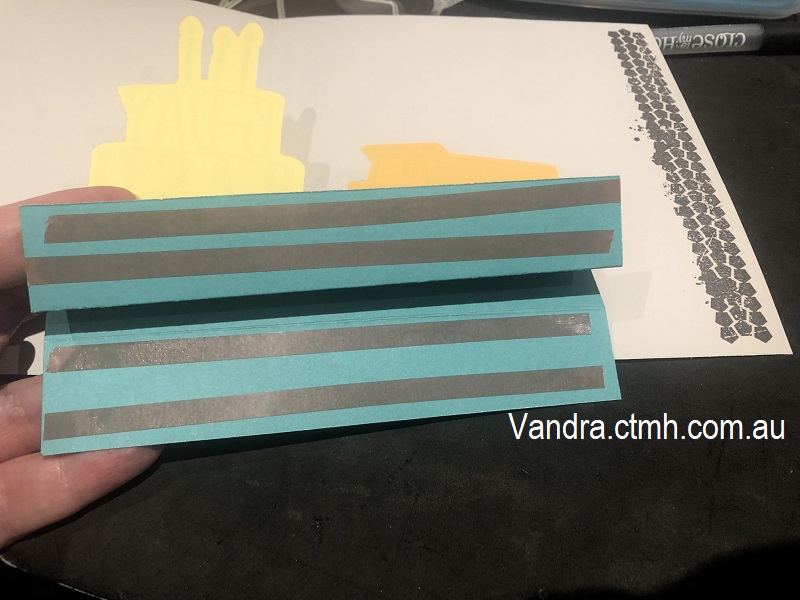
Inside I wanted to do a pop up so I cut a bit of lagoon cardstock at 4 inches wide by just under 6 inches long (it was a scrap that fit so I didn't measure). I scored at each inch along the section and folded up in the middle and down on the sides... valley fold on the sides and mountain fold in the centre. Then I decided to stamp the presents on each side from the Cake Day—Scrapbooking Stamp + Thin Cuts. Note to self: Stamp on this part BEFORE folding... stamping on a folded piece is not easy!

I also used Cake Day—Scrapbooking Stamp + Thin Cuts to cut the cake in Lemonade cardstock and stamp in black ink. Then I cut one of the candles off (only 3 candles required). Then I decided to do a cake on both sides so did a second one and cut off a different candle on the reverse side. 
#CTMHVandra, Colour dare, Birthday, cardmaking, stamping, cars, trucks, pop-up, road, stop, fun, technique, retired, commission,
I adhered the pop up lagoon section with my favourite strong bond adhesive tape simply called Adhesive Tape. (see above, it has a red layer that you pull off when ready to adhere). 

I also added a dump truck in Sundance - fussy cut out. 

#CTMHVandra, Colour dare, Birthday, cardmaking, stamping, cars, trucks, pop-up, road, stop, fun, technique, retired, commission,
It cast great shadows. 
#CTMHVandra, Colour dare, Birthday, cardmaking, stamping, cars, trucks, pop-up, road, stop, fun, technique, retired, commission,

The truck didn't really match but didn't look too bad and I cut the candles to show each side only having three candles. 

On the below side I also stamped the "Hooray! Hooray!" stamp on there (prior to sticking the items). I made sure adhesive only on the bottom of the first side and on second side only to place it where the stamps are touching so no adhesive sticking out. If I made a mistake I could correct with Anti-static Pouch to remove stickiness. 

 #CTMHVandra, Colour dare, Birthday, cardmaking, stamping, cars, trucks, pop-up, road, stop, fun, technique, retired, commission,

Finished off the inside with the tire tread stamp set and White Gel Pens drawn on the front to create a road. 

#CTMHVandra, Colour dare, Birthday, cardmaking, stamping, cars, trucks, pop-up, road, stop, fun, technique, retired, commission,


 Thanks so much for dropping by to check out my latest project. Hope you can join in the Colour My Heart Colour Dare Challenge #492. I'm really interested to hear what you think about my project, so I'd love you to leave a comment. See you again soon, subscribe to my blog so you don't miss a challenge.

If you don't have a Close to My Heart Consultant (and you're in Australia) feel free to contact me either on this blog or via my website HERE.
Vandra Stenton, Close to My Heart Consultant, Perth Western Australia

#CTMHVandra, color dare, Cricut Design Space, #ctmhasyougrow, cricut, Jennifer Maker, Flower Market, Birthday, papercraft, 3D, Kraft, gold, gifts,


Friday, 16 November 2018

Shake Things Up! - CTMH Technique Blog Hop

#CTMHVandra, Cardmaking with Caroline & Vandra, shaker card, acetate, window foam, video, Youtube, #CTMHBoutique, sugarplum, #CTMHGrateful Heart, #CTMHBearyChristmas, technique, tutorial,


Welcome to our Shake Things Up Technique Blog Hop. We are using our new shaker card products to make a shaker card or incorporate the associated products into our artwork in a creative way. This is an International blog hop group and I am in Australia, with lots of my sister consultants in this blog hop in the US and Canada.  If you have arrived here from Miss. Carrie’s Creations then you are in the right place. If you landed here another way, please join in by following the link at the end of this post. Follow the links, check out all the amazing ideas for using texture in your artworks and eventually you'll come right back here to where you started.

I have to say how much I love Shaker Cards and Close to My Heart have made it SOooo easy for us now with the new Shaker Card foam and acetate windows. Plus we have the fabulous Thin Cut to make the windows and confetti for our Shaker Cards. I have made HEAPS of these kinds of cards and its a fairly new product.

We have also been working on a YouTube Video which I will post here to give you an idea of how to use the Shaker Card items. I haven't given much description in this blog post so you can watch the video and find out how we made some of these cards. 


#CTMHVandra, Cardmaking with Caroline & Vandra, shaker card, acetate, window foam, video, Youtube, #CTMHBoutique, sugarplum, #CTMHGrateful Heart, #CTMHBearyChristmas, technique, tutorial,

#CTMHVandra, Cardmaking with Caroline & Vandra, shaker card, acetate, window foam, video, Youtube, #CTMHBoutique, sugarplum, #CTMHGrateful Heart, #CTMHBearyChristmas, technique, tutorial,

#CTMHVandra, Cardmaking with Caroline & Vandra, shaker card, acetate, window foam, video, Youtube, #CTMHBoutique, sugarplum, #CTMHGrateful Heart, #CTMHBearyChristmas, technique, tutorial,

#CTMHVandra, Cardmaking with Caroline & Vandra, shaker card, acetate, window foam, video, Youtube, #CTMHBoutique, sugarplum, #CTMHGrateful Heart, #CTMHBearyChristmas, technique, tutorial,

Thanks so much for dropping by to check out my latest project ideas. I'm really interested to hear what you think about my Shaker cards and our Video so I'd love you to leave a comment before heading off to the next stop on our Technique Blog Hop which is Lauren Moore. I hope you leave a lovely comment on all the blog posts and come back around to mine. See you again soon.

If you don't have a Close to My Heart Consultant (and you're in Australia) feel free to contact me either on this blog or via my website HERE

Vandra Stenton, Close to My Heart Consultant, Perth Western Australia


Tuesday, 16 October 2018

Paste-fully Creative - CTMH Technique Blog Hop


texture paste, #CTMHVandra, blog hop, technique, hearts, #CTMHBoutique, Boutique, survivor, Ribbon, Cancer Awareness, bling, base and bling, sugarplum, dots,

Welcome to our Paste-fully Creative - CTMH Technique Blog Hop. This month we are incorporating our new pastes and coordinating products to texturize our artwork. This is an International blog hop group and I am in Australia, with lots of my sister consultants in this blog hop in the US and Canada.  If you have arrived here from Tamara Sandwisch then you are in the right place. If you landed here another way, please join in by following the link at the end of this post. Follow the links, check out all the amazing ideas for using texture in your artworks and eventually you'll come right back here to where you started.

The first thing I did was grabbed out my Opaque Matte Texture PastePalette Knives and All-Purpose MatThen I grabbed out the cut out from the Thin Cuts—Shaker Window & Confetti with the heart cut outs that I'd made confetti with before. I used it as a template for my Texture paste. I used the Opaque Matte Texture Paste (White) on top of the Sugarplum CardstockI used the paper cut out circle a few times with the texture paste. It wasn't cut with the stencil so it will be thrown out afterwards, paper can be used as templates but it isn't reusable. I left my hearts pretty thick with texture paste before I removed the template, so it is more textured. 

texture paste, #CTMHVandra, blog hop, technique, hearts, #CTMHBoutique, Boutique, survivor, Ribbon, Cancer Awareness, bling, base and bling, sugarplum, dots,

I hadn't gotten out my circut to cut some templates in the stencil so I just cut some holes with a standard single punch hole punch. I used the Opaque Matte Texture Paste onto the Boutique picture my life card (see below).  

texture paste, #CTMHVandra, blog hop, technique, hearts, #CTMHBoutique, Boutique, survivor, Ribbon, Cancer Awareness, bling, base and bling, sugarplum, dots,


texture paste, #CTMHVandra, blog hop, technique, hearts, #CTMHBoutique, Boutique, survivor, Ribbon, Cancer Awareness, bling, base and bling, sugarplum, dots,

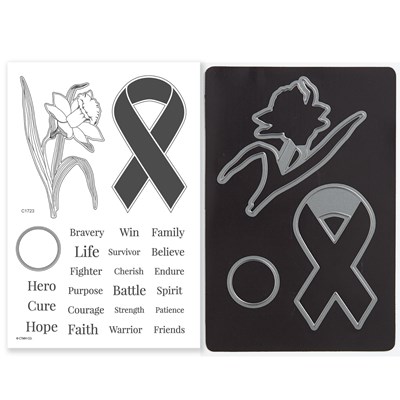
This month there is a limited time special on the Ribbon Warrior Stamp + Thin Cuts
For Cancer Awareness Month. So I used them to finish my cards. 
texture paste, #CTMHVandra, blog hop, technique, hearts, #CTMHBoutique, Boutique, survivor, Ribbon, Cancer Awareness, bling, base and bling, sugarplum, dots,
To finish off my sugar plum card, I put a the Boutique Peacock paper to the left hand side of the card and the Sugarplum with texture paste on 3D foam tape and the survivor circle in 3D. I stamped in Sugarplum and black Ink. The Mink Twine was wrapped around the card with the  Base & Bling Ribbon Charm—Faux Gold (these are in the Clearance section of our websites and match the Ribbon Warrior stamp set perfectly). The charm could be taken off and put on a necklace or bracelet after the card has been given. 

texture paste, #CTMHVandra, blog hop, technique, hearts, #CTMHBoutique, Boutique, survivor, Ribbon, Cancer Awareness, bling, base and bling, sugarplum, dots,
 I finished the PML card off with the the sticker from the Boutique Complements that I stamped Hope, Courage, Hero and Friends on in Black in. Then I wrapped the card in the Mink Twine with the  Base & Bling Ribbon Charm—Faux Gold tied to it. Put it up on 3D foam tape and put the spotty paper from the Boutique Paper Packet
Got some shadow on the photo.

texture paste, #CTMHVandra, blog hop, technique, hearts, #CTMHBoutique, Boutique, survivor, Ribbon, Cancer Awareness, bling, base and bling, sugarplum, dots,


 Thanks so much for dropping by to check out my latest project ideas. I'm really interested to hear what you think about my Cancer Awareness/Support Texture Paste cards so I'd love you to leave a comment before heading off to the next stop on our Technique Blog Hop which is Jayma Malme. I hope you leave a lovely comment on all the blog posts and come back around to mine. See you again soon.

If you don't have a Close to My Heart Consultant (and you're in Australia) feel free to contact me either on this blog or via my website HERE

Vandra Stenton, Close to My Heart Consultant, Perth Western Australia


Friday, 21 September 2018

Ballerina, Saffron & Peacock Colour Dare Challenge #311

#ctmhVandra, Colour Dare Challenge, color dare, peacock, texture paste, palette knives, opaque matte, hello, CTMH, technique, Butterflies,


This week's challenge Color Dare #311 was to use Ballerina, Saffron, Peacock with optional Gold. 

Guidelines on Neutrals:  White, Cream, Black, Gray, Kraft and Brown(s) are free to use.  Unless they're listed in the challenge then you need to use them.

For me my favourite colour is Peacock and so when I was demonstrating Opaque Matte Texture Paste to my cardmaking class today (at an adult learning community centre), I grabbed the Peacock Ink. I didn't have my re-inker at class to drop a few drops of ink down on my All-Purpose Mat so I turned my ink upside down and splatted it there. I pulled some texture paste out of the tub with the long skinny Palette Knife and then moved it onto the inky section and mixed it in (as below) with the thicker palette knife. 


#ctmhVandra, Colour Dare Challenge, color dare, peacock, texture paste, palette knives, opaque matte, hello, CTMH, technique, Butterflies,

After I Demoed the colour blending on the mat, I showed the stencil with a little butterfly cut out, quickly moved around and smeared it again and again (without rinsing the template between). With my left over peacock coloured texture paste I just smeared it over the White Daisy cardstock I had. 

#ctmhVandra, Colour Dare Challenge, color dare, peacock, texture paste, palette knives, opaque matte, hello, CTMH, technique, Butterflies,

After the peacock coloured texture paste dried I cut it down slightly to be 3.75 inches x 3.75 inches. I backed it with Saffron Cardstock. I cut s 0.75 inch strip of Ballerina Cardstock and stuck on one of the saffron coloured long stickers from the Boutique Complements
I cut it down and kept the left over piece. Then I punched out chipboard/card hello complement from the Boutique Complements and stuck it up on 3D Foam Tape. Later I may add some ribbon or other embellishments to it but I did like the simplicity of this card. A quick texture technique and BAM a card is made. I wanted to show the ladies at the class that you could do this quickly and easily and didn't need to use up much time. 


#ctmhVandra, Colour Dare Challenge, color dare, peacock, texture paste, palette knives, opaque matte, hello, CTMH, technique, Butterflies,


Thanks so much for dropping by to check out my latest project. Hope you can join in the Colour Dare Colour Challenge #311 too. I'm really interested to hear what you think about it, so I'd love you to leave a comment. See you again soon. If you don't have a Close to My Heart Consultant (and you're in Australia) feel free to contact me either on this blog or via my website HERE

Vandra Stenton, Close to My Heart Consultant, Perth Western Australia

Sunday, 16 September 2018

Sew What?! - CTMH Technique Blog Hop

#CTMHVandra, technique, blog hop, sewing, stitches, sugarplum, operation smile, hearts, beautiful Soul, circles, cardmaking, handmade, stamping, Vandra,


The Sew What?! Technique Blog Hop is about using stitching in your artwork - be it real stitches or faux stitching using Thin Cuts, stamp images, etc. This is my second time joining this Technique blog hop group and I'm very happy to be part of it because its an International group and I am in Australia, with lots of my sister consultants in this blog hop in the US and Canada.  If you have arrived here from Valerie Kapsha then you are in the right place. If you landed here another way, please join in by following the link at the end of this post. Follow the links, check out all the amazing ideas for using stitching in your artworks and eventually you'll come right back here to where you started.
I pulled out the new Stitched Borders stamp set that I wanted for this challenge. I started by stamping the shortest length stamp as shown below (the longest stitch) around the edge of my white daisy cardstock in black ink. Lining it up well as I could in a straight line for the second stamp to get the right length. 
#CTMHVandra, technique, blog hop, sewing, stitches, sugarplum, operation smile, hearts, beautiful Soul, circles, cardmaking, handmade, stamping, Vandra,
Then I pulled out my new Colour of the Year Sugarplum Exclusive Inks™ Stamp Pad and stamped the block words "you're a Beautiful Soul" from the Operation Smile™: Beautiful Soul stamp set. When you purchase this stamp set, Close to my Heart will donate $7 USD of the proceeds to Operation Smile™, a non-profit organization that provides surgeries to repair cleft lips and palates for children around the world.

#CTMHVandra, technique, blog hop, sewing, stitches, sugarplum, operation smile, hearts, beautiful Soul, circles, cardmaking, handmade, stamping, Vandra,

I cut out the sugar plum titles and placed them around the middle of the card so I could get the placement of the stitching circles. I lay them on top of the card so I could get the placement right but didn't stick them down right away. I moved them aside to stamp the circles. Then I stamped the two hearts from the Operation Smile™: Beautiful Soul with  Sugarplum Exclusive Ink™ and then stamped the stitched heart besides each one. To finish it off I layered the white daisy with Sugarplum Cardstock behind the card and then the title stuck on with 3D Foam tape. 


#CTMHVandra, technique, blog hop, sewing, stitches, sugarplum, operation smile, hearts, beautiful Soul, circles, cardmaking, handmade, stamping, Vandra,
I am very happy with my finished card although my photo looks a bit skewed - trust me its perfectly square - Trick photography :) 

#CTMHVandra, technique, blog hop, sewing, stitches, sugarplum, operation smile, hearts, beautiful Soul, circles, cardmaking, handmade, stamping, Vandra,


Thanks so much for dropping by to check out my latest project idea. I'm really interested to hear what you think about my stitched card, so I'd love you to leave a comment before heading off to the next stop on our Technique Blog Hop which is  Melissa Robinson I hope you leave a lovely comment on all the blog posts and come back around to mine. See you again soon.

If you don't have a Close to My Heart Consultant (and you're in Australia) feel free to contact me either on this blog or via my website HERE

Vandra Stenton, Close to My Heart Consultant, Perth Western Australia


Wednesday, 1 March 2017

Tea-rrific S1703 CTMH Australasian Blog Hop


Welcome to our Australasian Blog Hop. We have all been creating with the "Tea-rrific—March Stamp of the MonthStamp set. If you have arrived here from Doris Taylor Creative Inspirations then you are in the right place. If you landed here another way, please join in by following the link at the end of this post. Follow the links, check out all the amazing ideas and eventually you'll come right back here to where you started. 

Today I would like to share with you my project which features the Tea-rrific—March Stamp of the Month exclusively throughout March 2017 for $27 or for just $7.50 when you spend $75. 

Firstly can I say... I LOVE THIS STAMP SET SOOoooooooo Sooooooo MUCH!!!!! 

I did a demo last week with Water colour paints and techniques for my Seniors Card Making Class at an Adult learning centre. Some of my water colour samples I turned into cards for my Blog Hop. 

I taught the ladies the Smooshing technique by dropping watercoloured paint onto plastic and then smooshing it on Watercolor Paper. My watercolour paper samples were all 4x4 inches and I did cut it down slightly, then I used a larger piece of Pansy Cardstock to back the 5 1/2" × 4 1/4" White Cards & Envelopes, Value Pack

Then I stamped the Happy Mothers Day cup and the "steam" three times with Black Memento™ Ink Pad.

To finish the card off I tied a bow with Blush Shimmer Ribbon so it looked balanced and even plus pretty and delicate. My mum was with me when I made the card but she promises to be surprised on Mothers Day receiving it (heheheheheee).  


For another Sample I stamped Black Memento™ Ink Pad on 12" × 12" Colonial White Cardstock with the Hello Lovely Cardmaking Thin Cuts Bundle Flower stamp (This stamp set with thin cuts bundled together are 25% off this month only!!). Such a great flower stamp. I wanted to show my seniors ladies that you can use Watercolor Paints with normal paper it just tends to buckle a little (and obviously can't be completely covered in water or paint). Using it to paint the flowers is just enough to not buckle the paper completely. I used the Waterbrush—Medium Round to paint the flowers so it wasn't too wet. 

Goes great with paper from Workshops Your Way® Hello Lovely Scrapbooking Kit and the "Good times are even better when they are shared." sentiment from the Tea-rrific—March Stamp of the Month.

I used Tombow® Permanent Adhesive and stuck Hello Lovely Paper and Colonial White cardstock on the 5 1/2" × 4 1/4" Colonial White Cards & Envelopes, Value Pack.


I also had made up the cards in the Workshops Your Way® Hello Baby Cardmaking Kit 
last week and had leftover pieces cut from the kit that I hadn't made up into cards yet, so I used the base just like the cards (shown below in stock image). 


Using the stamp of the month with the two joining sentiments I made the following card. Using my Black Memento™ Ink Pad (have you noticed its my favourite black ink?!!) I stamped the image and the sentiments then coloured in the cups with my shinhan markers 

Its a very simple card so it may need some bling but the sentiment is the most important feature of the card I feel so the subtle design of the baby card/turned grownup card is enough. I did cut the ribbon to stick on as per the above image but it didn't really go well with the cups so I didn't end up using it. 


Remember this great stamp set Tea-rrific—March Stamp of the Month is only available throughout March from my website or from your Close to My Heart Consultant

Thanks so much for dropping by to check out my latest projects. I'm really interested to hear what you think about them, so I'd love you to leave a comment before heading off to the next stop on our Australasian Blog Hop which is  Creating with Kara Davies.