Showing posts with label Baby. Show all posts

Friday, 28 October 2022

Colour Dare #520 - Tic-Tac-Toe Christmas Story Paperpack

#ctmhVandra, Colour dare, color dare, baking, cooking, Christmas, #CTMHChristmasStory, #CTMHFreshlyBaked, silver foil, thin cuts, cookies, Baby, TicTacToe,

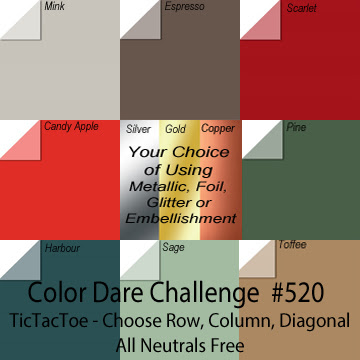
Our Colour Dare Challenge for #520 is a Tic-Tac-Toe board, with Neutrals free to use. You need to pick the colours in a row or column or diagonal. When you are creating for more than one challenge please make sure your project meets our requirement. Most importantly - have fun!  Go to the link for Colour Dare #520 and add your entry. When you submit your entry you must provide a link to your post, not just to your blog in general. There are LOTS of ways to enter either a Blog Post or post to an online gallery (Facebook, Pinterest or Instagram etc), more details on the Colour Dare Blog post (see link above).

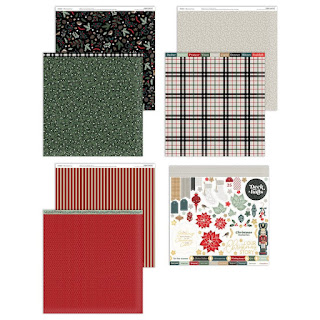
This colour dare is designed around Christmas Story Paper Packet + Sticker Sheet
#ctmhVandra, Colour dare, color dare, baking, cooking, Christmas, #CTMHChristmasStory, #CTMHFreshlyBaked, silver foil, thin cuts, cookies, Baby, TicTacToe,

I decided to do the Diagonal Harbour, Silver & Scarlet. I had the new Freshly Baked—Scrapbooking Stamp + Thin Cuts and I really wanted to use the silver to create a baking wire cooling rack. I pulled out some of the retired Silver Foil paper and a scrap bit of it. I ran that thru my big shot and then stuck it on the Scarlet Cardstock. I ended up cutting it on the diagonal and sticking it on an angle onto the top of my card. (cutting this thru a trimmer was a tricky thing... it messed up a bit and I ended up cutting it smaller than originally intended. If you are going to cut this be careful and maybe cut from the back).

I used normal adhesive to stick the silver foil rack onto the Scarlet Cardstock but I ended up getting adhesive on the front but I figured it looked more realistic to how my own personal baking rack looks with all the cake stuck to it. 

As you can see from the picture of the Freshly Baked—Scrapbooking Stamp + Thin Cuts there are the cutest little cookies and an icing bag. I cut a few of the cookies and the piping back with White Daisy Cardstock and stamped them with Harbour Exclusive Inks™ Stamp Pad.
#ctmhVandra, Colour dare, color dare, baking, cooking, Christmas, #CTMHChristmasStory, #CTMHFreshlyBaked, silver foil, thin cuts, cookies, Baby, TicTacToe,

I ended up not using the cookies that I die-cut and stamped... I used the cookie heart stickers from the Freshly Baked Paper Packet Sticker Sheet. BUT... I did use the icing bag. From this stamp set I also used the stamp sentiment of the Cute Cookie but I only stamped on the cute cookie and masked off the one. I stamped that with Harbour ink directly onto the White Cards & Envelopes Value Pack card directly. 

I finished off the card with a white 1 shape from Cricut to make the sentiment 1 cute cookie. Then I put the sticker cookies around the 1 and I embellished with the cute new Freshly Baked Dots... I think calling them dots is a bit misleading because they're the cutest stars, hearts and dots (this is the new way that dots are coming in the Annual catalogue. 

#ctmhVandra, Colour dare, color dare, baking, cooking, Christmas, #CTMHChristmasStory, #CTMHFreshlyBaked, silver foil, thin cuts, cookies, Baby, TicTacToe,
I was happy with how it finished off with those cute little hearts and dots in the Scarlet colour. I hope you like it too. I thought it would make a cute 1st birthday card. 

#ctmhVandra, Colour dare, color dare, baking, cooking, Christmas, #CTMHChristmasStory, #CTMHFreshlyBaked, silver foil, thin cuts, cookies, Baby, TicTacToe,

Thanks so much for dropping by to check out my latest project. Hope you can join in the Colour My Heart Colour Dare Challenge #520. I'm really interested to hear what you think about my project, so I'd love you to leave a comment. See you again soon, subscribe to my blog so you don't miss a challenge.

If you don't have a Close to My Heart Consultant (and you're in Australia) feel free to contact me either on this blog or via my website HERE.
Vandra Stenton, Close to My Heart Consultant, Perth Western Australia
www.vandra.closetomyheart.com.au

Wednesday, 1 March 2017

Tea-rrific S1703 CTMH Australasian Blog Hop


Welcome to our Australasian Blog Hop. We have all been creating with the "Tea-rrific—March Stamp of the MonthStamp set. If you have arrived here from Doris Taylor Creative Inspirations then you are in the right place. If you landed here another way, please join in by following the link at the end of this post. Follow the links, check out all the amazing ideas and eventually you'll come right back here to where you started. 

Today I would like to share with you my project which features the Tea-rrific—March Stamp of the Month exclusively throughout March 2017 for $27 or for just $7.50 when you spend $75. 

Firstly can I say... I LOVE THIS STAMP SET SOOoooooooo Sooooooo MUCH!!!!! 

I did a demo last week with Water colour paints and techniques for my Seniors Card Making Class at an Adult learning centre. Some of my water colour samples I turned into cards for my Blog Hop. 

I taught the ladies the Smooshing technique by dropping watercoloured paint onto plastic and then smooshing it on Watercolor Paper. My watercolour paper samples were all 4x4 inches and I did cut it down slightly, then I used a larger piece of Pansy Cardstock to back the 5 1/2" × 4 1/4" White Cards & Envelopes, Value Pack

Then I stamped the Happy Mothers Day cup and the "steam" three times with Black Memento™ Ink Pad.

To finish the card off I tied a bow with Blush Shimmer Ribbon so it looked balanced and even plus pretty and delicate. My mum was with me when I made the card but she promises to be surprised on Mothers Day receiving it (heheheheheee).  


For another Sample I stamped Black Memento™ Ink Pad on 12" × 12" Colonial White Cardstock with the Hello Lovely Cardmaking Thin Cuts Bundle Flower stamp (This stamp set with thin cuts bundled together are 25% off this month only!!). Such a great flower stamp. I wanted to show my seniors ladies that you can use Watercolor Paints with normal paper it just tends to buckle a little (and obviously can't be completely covered in water or paint). Using it to paint the flowers is just enough to not buckle the paper completely. I used the Waterbrush—Medium Round to paint the flowers so it wasn't too wet. 

Goes great with paper from Workshops Your Way® Hello Lovely Scrapbooking Kit and the "Good times are even better when they are shared." sentiment from the Tea-rrific—March Stamp of the Month.

I used Tombow® Permanent Adhesive and stuck Hello Lovely Paper and Colonial White cardstock on the 5 1/2" × 4 1/4" Colonial White Cards & Envelopes, Value Pack.


I also had made up the cards in the Workshops Your Way® Hello Baby Cardmaking Kit 
last week and had leftover pieces cut from the kit that I hadn't made up into cards yet, so I used the base just like the cards (shown below in stock image). 


Using the stamp of the month with the two joining sentiments I made the following card. Using my Black Memento™ Ink Pad (have you noticed its my favourite black ink?!!) I stamped the image and the sentiments then coloured in the cups with my shinhan markers 

Its a very simple card so it may need some bling but the sentiment is the most important feature of the card I feel so the subtle design of the baby card/turned grownup card is enough. I did cut the ribbon to stick on as per the above image but it didn't really go well with the cups so I didn't end up using it. 


Remember this great stamp set Tea-rrific—March Stamp of the Month is only available throughout March from my website or from your Close to My Heart Consultant

Thanks so much for dropping by to check out my latest projects. I'm really interested to hear what you think about them, so I'd love you to leave a comment before heading off to the next stop on our Australasian Blog Hop which is  Creating with Kara Davies.


Wednesday, 1 June 2016

The Long Way Home June SOTM Australasian Blog Hop

Welcome to our Australasian Blog Hop. We have all been creating with "The Long Way Home—June Stamp of the MonthStamp set. 

If you have arrived here from Doris Taylor Creative Inspirations then you are in the right place. If you landed here another way, please join in by following the link at the end of this post. Follow the links, check out all the amazing ideas and eventually you'll come right back here to where you started. 

Today I would like to share with you my projects which features the The Long Way Home—June Stamp of the Month available exclusively throughout June 2016 for $27 or for just $7.50 when you spend $75.


I LOVE this stamp set and plan to make some Scrapbook pages of my daughters first bike ride without her training wheels. Its so perfect for it because we were on a family holiday in Bunbury (2.5 hrs south of where we live), when we took those photos. I haven't had a chance to get those photos printed yet so its going to happen next time!


I am still in the mode of making Baby Cards (see last blog hop about Georgie Workshop on the Go) and thought the "Miles of Smiles" title would look great on a baby card. 

I have been making cards with the Wild Wonders baby stamp set (as per the last blog hop) and I thought the Giraffe would suit the Miles of Smiles - because the neck of a giraffe is miles and miles long... 

or is it...


Okay so I wanted to make the giraffes neck EVEN Longer... So I inked up the bottom half of the giraffe with Slate Exclusive Inks™ Stamp Pad and stamped that directly on the 5 1/2" X 4 1/4" White Cards & Envelopes, Value Pack card. 


Next I cleaned the stamp with My Acrylix® Spritz Cleaner and My Acrylix® Stamp Scrubber.
I made sure the stamp was completely dry by stamping a few times on my scrap paper. Then I inked the Top half of the giraffe - its head and neck only. 

Then I stamped the top half, lining it up as well as I could. 


He turned out really cute. With a really, really long neck! I was planning to hide the join line but it was pretty good and could have been covered with a Bow or ribbon or something to hide the join if you were making him at another time. 

To finish off the card I put 1 x 5.5 inch strips of yellow paper from the Workshops on the Go® Georgie Scrapbooking Kit with the stamps from the Wild Wonders stamp set wording plus Hopscotch Alphabet to spell "baby".

Then 1 inch squares of the yellow Georgie paper at the top. All Stamped with Slate Exclusive Inks™ Stamp Pad. The Miles of Smiles sign was stamped on 12" X 12" White Daisy Cardstock with Slate Exclusive Inks™ Stamp Pad. I stuck on the sign of Miles of Smiles with 3-D Foam Tape for some dimension. 

TIP: To cut the Gold Shimmer Trim in half. 
1. Remove the Shimmer Trim backing and lightly adhere the 5.5 inches of shimmer trim equally one quarter inch on each side of the cut line on the SureCut™ Deluxe Craft Paper Trimmer
2. Slide the blade up to cut the shimmer trim in half. 
3. Remove the Shimmer Trim from the trimmer and adhere on either side of the B&T paper on your card. Don't leave it there too long or it will become harder to remove from the trimmer. 


Remember this great stamp set  The Long Way Home—June Stamp of the Month is only available throughout June from my website or from your Close to My Heart Consultant

Thanks so much for dropping by to check out my latest project, I hope you get inspired. I'm really interested to hear what you think about it, so I'd love you to leave a comment before heading off to the next stop on our Australasian Blog Hop which is Tanya- Happy Papercrafting.

Come back to see me again soon.


Friday, 20 May 2016

Georgie CTMH Australasian Blog Hop


Welcome to our Australasian Close to My Heart Blog Hop featuring this months featured pack called Workshops on the Go® Georgie Scrapbooking KitIf you have arrived here from Shaunna Richards - Passionate About Pages then you are in the right place. If you landed here another way, please join in by following the link at the end of this post. Follow the links, check out all the amazing ideas and eventually you'll come right back here to where you started.

We are all creating with the Workshops on the Go® Georgie Scrapbooking Kit.
This kit is featured by Close to My Heart in May and is until the end of the current Annual Expressions Ideas Book (so will be retiring at the end of July 2016). NOT LONG!!
This is the cutest paper pack with my favourite Elephant paper. You can use this paper for any project (not just babies). I however have been asked specifically if I can do Baby Cards recently so I have been making more Baby Cards. 

I love this Wild Wonders stamp set that is available for also a limited time. 

I made my card by cutting my yellow Georgie paper into 1.5" x 2.5" strips and cut Colonial White Cardstock into 1.25"x 2.25" strips. I stamped the words and animals in Slate Exclusive Inks™ Stamp Pad and the vine along the bottom of 5 1/2" X 4 1/4" Colonial White Cards & Envelopes, Value Pack also stamped in Slate. I stuck some of my stash of Puffies on the vine at the bottom. (some puffies are available in the Clearance section of my website). 

Happy with my baby card, suitable for both boys or girls or "unknown". 


Remember Georgie is only available for a limited time so make sure you get it soon, so you don't miss out! Go to my website www.vandra.ctmh.com.au or your consultants website and order today. 

Thanks so much for dropping by to check out my latest project. I'm really interested to hear what you think about it, so I'd love you to leave a comment before heading off to the next stop on our Australasian Blog Hop which is Doris Taylor Creative Inspirations.

  Come back to see me again soon.