Showing posts with label musical. Show all posts

Sunday, 1 July 2018

Highlight Reel S1807 Stamp of the Month CTMH Australasian Blog Hop


Welcome to our Australasian Blog Hop. A small group of us have been creating with the "Highlight Reel—July Stamp of the Month" Stamp set. If you have arrived here from Doreen Watkins then you are in the right place. If you landed here another way, please join in by following the link at the end of this post. Follow the links, check out all the amazing ideas and eventually you'll come right back here to where you started. 

Today I would like to share with you my projects which features the Highlight Reel—July Stamp of the Month available exclusively throughout July 2018 for $27 or for just $7.50 when you spend $75. Please note that prices do not include GST. Beginning 1 July 2018, 10% GST will be added to your order at checkout.
#CTMHVandra, #storybyStacy, Story by Stacy, Rainbow, bullet journalling, journalling, music, musical, cards, travel, 4x4, Reel, Highlight Reel, S1807, stripes, storytelling, Birthday, scrapbooking, icons, Vandra,
This cute little set is perfect for adding little titles or icons to your scrapbooking, journalling, bullet journals, or cards. I used it for a mini scrapbook kit called Story by Stacy™ Story Starter Workshop Kit—Stripes
#CTMHVandra, #storybyStacy, Story by Stacy, Rainbow, bullet journalling, journalling, music, musical, cards, travel, 4x4, Reel, Highlight Reel, S1807, stripes, storytelling, Birthday, scrapbooking, icons, Vandra,
I got one of these at our Convention and while there decided to do an album for my sister who's moved to the UK recently. I purchased a second one to have a copy for myself at home, for the kids to look at and for my to show off to everyone how cute these little albums are. I don't want to share the whole album online because it is private for my sisters birthday but I wanted to show a few pages I did using these cute little icons from this months stamp of the month.  

There are some great instructions inside the Story Starter kit to make this album and I worked on it from the story before the photos. 
The Album is called "What we know and love about DAENA" for her Birthday in June (it may be arriving a few days late as it hasn't arrived yet and her birthday was the 25th June - it will be worth the wait I promise DM). 

I knew Daena loves music and how fortuitous this set has MUSIC NOTES (This is so handy for me because both my children are learning instruments, so this tiny stamp will get a workout), it will make a cute bullet point for journalling on the big scrapbook pages and it makes a cute addition to the smaller pages or cards (especially cards to thank the music teachers at the end of the year!). 

Watch the short video below for how Story by Stacy little 4x4 sized albums and story starter kit work. 


Once I had determined I wanted to write about Music I used the back of the white card to stamp Heather Exclusive Inks™ Stamp Pad all down the side of the card (x2), the other side has lines. You can see that I ran off the bottom with a bit of scrap so I could get a single note down there and have the corner all stamped up. 

#CTMHVandra, #storybyStacy, Story by Stacy, Rainbow, bullet journalling, journalling, music, musical, cards, travel, 4x4, Reel, Highlight Reel, S1807, stripes, storytelling, Birthday, scrapbooking, icons, Vandra,

Due to the fact that this little album is travelling from Australia to the UK I wanted to make it as light as possible, so I stamped and wrote on both sides of the cards. I have HEAPS of cards left over because the kit is designed to have one bit of card for each side and gives you a whole set as a practice set (I only practiced a few pages so have LOTS of cards left so I can use them in other ways! yay!!). I was happy with how it turned out and I don't think you can see thru it (unless you hold it up to the light). It ended up weighing less than 100 grams, so worth all the weight reductions. 


#CTMHVandra, #storybyStacy, Story by Stacy, Rainbow, bullet journalling, journalling, music, musical, cards, travel, 4x4, Reel, Highlight Reel, S1807, stripes, storytelling, Birthday, scrapbooking, icons, Vandra,

The end result above, after writing on it was the above (you can't see anything from the page before). 

The next icon I knew I had to use was the little plane - as you can see from the below pic I ended up doing a couple of placements for the plane. I ended up liking the bottom one better so I sent that one in my sisters album. She loves to Travel so this plane is the perfect for the travel page of her album. 

I had plenty of cards to re-stamp them but I decided it didn't matter if our two albums were slightly different, because they are each UNIQUE. 
#CTMHVandra, #storybyStacy, Story by Stacy, Rainbow, bullet journalling, journalling, music, musical, cards, travel, 4x4, Reel, Highlight Reel, S1807, stripes, storytelling, Birthday, scrapbooking, icons, Vandra,

I had so much fun making this little album and finding photos to fit them. Some of the pages I did a collage prints and got 4 photos in the space.  I would recommend everyone do one of these tiny albums of things you know and love about your family or friends. I'm sure it will become a treasured keepsake. Plus the Highlight Reel is the perfect stamp set to accompany it. 

Remember this great stamp set Highlight Reel—July Stamp of the Month is only available throughout July from my website or from your Close to My Heart Consultant. If you don't have a Close to My Heart Consultant feel free to contact me either on this blog or via my website HERE. 

Thanks so much for dropping by to check out my latest project ideas. I'm really interested to hear what you think about them, so I'd love you to leave a comment before heading off to the next stop on our Australasian Blog Hop which is Lauren Moore. I hope you leave a lovely comment on all the blog posts and come back around to mine. See you again soon. 

🎵 Happy New Financial Year everyone - You can make new years resolutions today about what you'll do in the next financial year... I resolve to post more of my artworks on my blog, Pinterest, Instagram and my Facebook Business Page, so I will have to DO more artworks, cards, pages, tags, bookmarks, off the page items, papercrafts and all sorts of fun things, to inspire my loyal followers, customers, family and friends. Watch this space. ðŸŽµ

Vandra Stenton, Close to My Heart Consultant, Perth Western Australia


Wednesday, 15 June 2016

Piano Cards

I was recently commissioned by a friend to make three black and white Piano/musical cards for my friend to give to her friend who is a piano teacher. I love an artistic challenge. She asked that I didn't put any title on the cards, which made it easy. 

I got some inspiration from Pinterest and created 3 different cards along the piano theme. 

Card 1 - was started with a strip of black cardstock 5.5 x 4.25 inches stuck on our 5 1/2" × 4 1/4" Colonial White Cards & Envelopes, Value Pack with Duck® Easy Stick™ Adhesive.

Next I got a strip of white cardstock about 1.5inches x 5.5 inches. I cut the white at 0.5 inches wide on the SureCut™ Deluxe Craft Paper Trimmer. I don't cut things completely evenly so I had a small strip left over at the end but this was perfect because it allowed me to space apart the keys to show the black through them. I cut the black strip of paper about 1 inch wide x 3/8" inch wide.


To get the little music book shape. I used a scrap of 12" × 12" Colonial White Cardstock 
with the musical flower from the Hello Blooms stamp set (shown below) stamped with Black Memento™ Ink Pad. I rounded the top of the "book" so it looked more like a book and added a thin strip of Black Cardstock to finish it off. I stuck it onto the card along the middle and folded up the edges. 

I used Silver Shimmer Trim to complete the edge of the keyboard. 

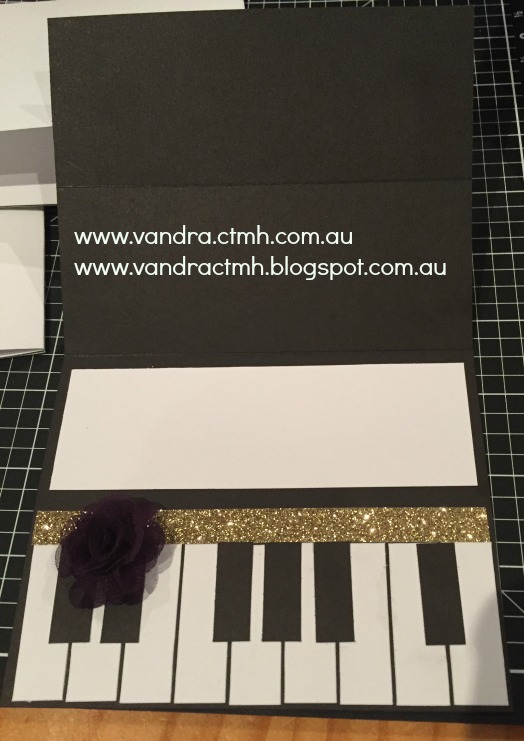
Card 2 - The next card I made was a sit up card. I used the same measurements for the black and white keys. The base card was cut in Black Cardstock at 5x8 inches. Then I scored the card at 4 inches and 6 inches. I wanted it to fit into the bulk envelopes from the 5 1/2" × 4 1/4" White Cards & Envelopes, Value Pack.


I added an extra piece of Black Cardstock cardstock at 5x4 inches on the front of the folds (see below). I used the retired paper Yuletide Carol that has music on it to mat that in the same size. Then small 1.5x1 inch squares of it x 6 and used small bits of Black Cardstock that I matted the musical paper on. Both sides of the top strip and just the top side of the bottom bit (thats a confusing sentence!). I stuck it together with my Mini Stapler and Mini Staples. I used Gold Shimmer Trim to frame the keys and to make a "shelf". 

I used the Ivy Lane Assortment purple flower to make something to hold the fold card up and it adds a pretty floral element.  


Inside I added a strip of 12" × 12" White Daisy Cardstock for somewhere to write on. 


I folded the little musical book so it stuck out 3D. 

Card 3 - The last card I made was a Piano shape. I freehand cut the shape of the piano in 12" × 12" Black Cardstock scraps. The white and black keys were also the same sizes but I shortened the length of them by a quarter inch. To finish the card I added Gold Shimmer Trim and then the Gold Foil Tape along the top of the piano keys. I had thought I may cut off the white section at the top of the  5 1/2" × 4 1/4" White Cards & Envelopes, Value Pack card but I decided the inside of the card needed the extra space for writing (if I cut off the top section you would have less space to write). 


The below photo with all the cards in was taken where I made them at my regular crop day at Brown Park in Swan View (not the greatest lighting). If you'd like a day of scrapbooking/cardmaking or any kind of crafting, then please let me know and I can give you more info. The day includes morning tea, lunch, afternoon tea, table goodies, door prizes, displays and sometimes workshop demonstrations & samples.  


Sunday, 20 March 2016

CTMH Australasian Stampaganza Blog Hop


Welcome to our Australasian Close to My Heart Blog Hop featuring every stamp set currently available to purchase for STAMPAGANZA. March is Buy 2 stamp sets and get 1 FREE!!

If you have arrived here from Tanya Armitage-   Happy Papercrafting then you are in the right place. If you landed here another way, please join in by following the link at the end of this post. Follow the links, check out all the amazing ideas and eventually you'll come right back here to where you started.

I decided to use a selection of stamp sets for my blog this hop because there are so many stamp sets available and this is a really great offer. 

I started with Watercolor Paints and painted up some paper with my Paintbrush Set. 
This is my first page by 12" X 12" White Daisy Cardstock (I should have used Watercolor Paper  but I forgot and it worked out okay). 

Then I used some off cuts of 12" X 12" Colonial White Cardstock


Then I used one of the bunnies from the Spring Critters that I cut out using the Spring Critters Thin Cuts on my Big Shot Embossing Machine using 12" X 12" White Daisy Cardstock with Black Exclusive Inks™ Stamp Pad and used my Watercolor Paints and Paintbrush Set to paint him. So cute, using the smallest paintbrush to colour him in. 


Then I decided to paint some free-hand Carrots in a "bunch" to create a Thank You card with a difference. 


I matted the green background I had watercoloured and my carrots with 12" X 12" Slate Cardstock and used 3-D Foam Tape to adhere the bunny in a 3D way. I finished it off with Coral Shimmer Trim.


Next, after my 12" X 12" White Daisy Cardstock page that I had painted with the green edging had dried. I stamped with Black Exclusive Inks™ Stamp Pad and stamped Delightful Ditty musical stamps all over the edge.

I stamped with Black Exclusive Inks™ Stamp Pad over the top of the water colour painting. I LOVE this stamp set. So versatile for a musical family like ours. 


My son is off to his first band camp in a few weeks. So now I have a page all ready. I put the title with the stamp set Handwritten Print and the LOVES it. 


To finish off my last watercolour painting scraps I used the Always Grateful 
stamp set. 
I matted the 12" X 12" Colonial White Cardstock scraps I had painted in purple with 12" X 12" Black Cardstock and stamped on the tree and Black Exclusive Inks™ Stamp Pad. 
Simple and Elegant and I love it. 


With the STAMPAGANZA special you get 1 stamp set FREE when you buy 2. 
During March, buy any two My Acrylix® stamp sets (M-, A-, B-, C-, D-, or E-size) at full retail price, get a third stamp set of equal or lesser value FREE! That is a savings of up to $45.00! Take advantage of this amazing deal by simply adding your selected stamps to your cart!

Remember STAMPAGANZA is only available for March 2016 so make sure you get it soon, so you don't miss out! Go to my website www.vandra.ctmh.com.au and order today. 

Thanks so much for dropping by to check out my latest projects. I'm really interested to hear what you think about what I've made, so I'd love you to leave a comment before heading off to the next stop on our Australasian Blog Hop which is 

  Come back to see me again soon.