Showing posts with label Workshops Your Way. Show all posts

Friday, 15 February 2019

I Heart Us Australasian CTMH Blog Hop


Welcome to our Australasian Blog Hop. We have all been creating with the most prettily decorative paper suite Workshops Your Way® I Heart Us Scrapbooking Kit matching complements, kits, stamp sets and twine, which is featured this month. If you have arrived here from Doris Taylor - Creative Inspirations then you are in the right place. If you landed here another way, please join in by following the link at the end of this post. Follow the links, check out all the amazing ideas and eventually you'll come right back here to where you started.

_____________________________________________

Workshops Your Way® I Heart Us Scrapbooking Kit#CTMHVandra, #ctmhiheartus, Rainbow, flowers, wonderful, hearts, shimmer, glitter paper, 3D Foam, Valentine, Birthday, thank you, thank you, Workshops Your Way, cardmaking, Vandras online card club,

Product Description
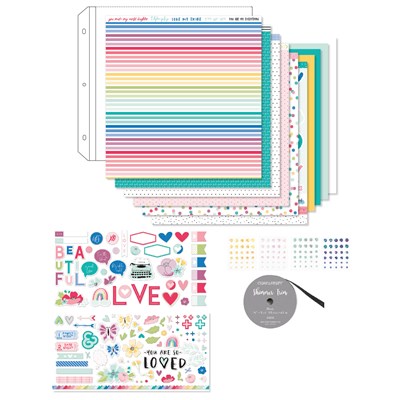
Kit contents:
1 – I Heart Us Paper Packet (X7242B)
1 – I Heart Us Complements (X7242C)
5 — cardstock sheets (1 Canary, 1 Lagoon, 1 Mint, 2 White Daisy)
1 – I Heart Us Sequins (Z4270)
1 – Black Shimmer Trim (Z1809)
4 – Memory Protectors™ Top Load
photo placeholders
printed instructions
_____________________________________________


First thing I did was lay out all the beautiful bright colours and papers and complements and that stunning pre-printed paper and marvelled at how fun and colourful it all is. The sentiments are lovely and uplifting and would suit photo albums or cards for families, friends, children, loved ones, significant others and a whole myriad of fantastic positive uplifting content. 

#CTMHVandra, #ctmhiheartus, Rainbow, flowers, wonderful, hearts, shimmer, glitter paper, 3D Foam, Valentine, Birthday, thank you, thank you, Workshops Your Way, cardmaking, Vandras online card club,

I have been making cards up for my monthly card club. This one below is a sneek peek from the club kits that go out this week. The people involved in my card club get all the pieces to put together 4 cards and 2 gift cards (3x3 size). The below card uses the black and white hearts, with black cardstock backing, the rainbow paper (my favourite paper) and pixie cut flowers from the Cricut® Flower Market Digital Collection and the stamp set I Heart Us—Cardmaking is for the Thanks.

#CTMHVandra, #ctmhiheartus, Rainbow, flowers, wonderful, hearts, shimmer, glitter paper, 3D Foam, Valentine, Birthday, thank you, thank you, Workshops Your Way, cardmaking, Vandras online card club,

The next card I made would be great for Valentines Day (I handed it to my husband and then took it back for Valentines day - I'd already given him a card). I used the scraps from my last card to add the background rainbows. Then I cut the 3x4 inch You are so Wonderful to me card from the pre-printed paper on the paper pack. I added a black piece of cardstock 3 1/8 x4 1/8 inches behind the cardstock. Then I put that up on 3D foam tape and put a bit of Gold Shimmer paper at 3.5 x 4.5 inches. The bluebird heart is a chipboard style piece of complements. I inked the outside of the heart with Bluebird ink and used a small bit of 3D foam tape to have the edge of the heart at the same height as the main part. 

#CTMHVandra, #ctmhiheartus, Rainbow, flowers, wonderful, hearts, shimmer, glitter paper, 3D Foam, Valentine, Birthday, thank you, thank you, Workshops Your Way, cardmaking, Vandras online card club,

I also did a birthday card cause today is my BIRTHDAY!! YAY!! Valentines day and my birthday within two days always gives lots of excuses for cards. That card is going to be posted today on my blog too, come back later to see that post and my easy to make Happy Birthday Card using this lovely rainbow papers. 

Remember this great set Workshops Your Way® I Heart Us Scrapbooking Kit and associated things will be only available while stocks last with this catalogue. Go to my website or to your Close to My Heart Consultant. If you don't have a Close to My Heart Consultant feel free to contact me either on this blog or via my website HERE

Thanks so much for dropping by to check out my latest project ideas. I'm really interested to hear what you think about them, so I'd love you to leave a comment before heading off to the next stop on our Australasian Blog Hop which is Lauren Moore I hope you leave a lovely comment on all the blog posts and come back around to mine. See you again soon.

Vandra Stenton, Close to My Heart Consultant, Perth Western Australia


Saturday, 15 December 2018

Oh What Fun CTMH Australasian Blog Hop


Welcome to our Australasian Blog Hop. We have all been creating with the most lovely paper suite Workshops Your Way® Oh What Fun Scrapbooking Kit matching complements, kits, stamp sets and twine, which is featured this month. If you have arrived here from Maz Wood then you are in the right place. If you landed here another way, please join in by following the link at the end of this post. Follow the links, check out all the amazing ideas and eventually you'll come right back here to where you started.

________________________________________________________

Workshops Your Way® Oh What Fun Scrapbooking Kit

#CTMHVandra, Christmas, decorations, Christmas tree, #ctmhOhWhatFun, blog hop, 3D, papercrafting, papercraft, sparkles, felt, Workshops Your Way,

Product Description

Kit contents:1 – Oh What Fun Paper Packet (X7238B)
1 – Oh What Fun Complements(X7238C)
4 – cardstock sheets (1 Clover, 2 Lagoon, 1 White Daisy)
1 – Oh What Fun Felt Shapes (Z4228)
1 – Raspberry Baker's Twine (Z4216)
photo placeholders
printed instructions


Use the materials in this kit to create three coordinating scrapbook layouts. (Instructions also found on your consultants website and on my website here.)


________________________________________________________

I love these Oh What Fun Felt Shapes and I wanted to do something special with them. I still had some 'Tis the Season Snowflakes left from last month and have seen a number of decorations being made with them. So I collected my ingredients from Workshops Your Way® Oh What Fun Scrapbooking Kit ... the Felt shapes, the Snowflakes, Raspberry Baker's Twine and some Clover Cardstock cut with Thin Cuts—Stitched Circles

#CTMHVandra, Christmas, decorations, Christmas tree, #ctmhOhWhatFun, blog hop, 3D, papercrafting, papercraft, sparkles, felt, Workshops Your Way,

I cut the clover circles with the light side up because I wanted the dark green to show through the holes in the snowflakes. From the back they'll also look neat with the stitched ring on the light side. I stuck the Raspberry bakers twine to the 3D foam adhesive. Put a bit extra Tombow® Permanent Adhesive to make sure they stuck to the ribbon and the circles.

#CTMHVandra, Christmas, decorations, Christmas tree, #ctmhOhWhatFun, blog hop, 3D, papercrafting, papercraft, sparkles, felt, Workshops Your Way,

So quick and easy to put together as the felt are stickers so they just stuck onto the front of the snowflakes with the dark green clover cardstock cirlces showing through the holes and the larges 4 felt shapes. So cute. So easy and they look great on our Christmas Tree (although I may use them as gifts on cards but I'm not sure yet). 

#CTMHVandra, Christmas, decorations, Christmas tree, #ctmhOhWhatFun, blog hop, 3D, papercrafting, papercraft, sparkles, felt, Workshops Your Way,

Best part is that I've still got 4 small felt shapes to use on other projects. 

Remember this great set Workshops Your Way® Oh What Fun Scrapbooking Kit and associated things will be only available while stocks last with this seasonal catalogue which finishes at the end of December (if not sold out beforehand) TWO WEEKS!!! So DON'T MISS OUT!!! Go to my website or to your Close to My Heart Consultant. If you don't have a Close to My Heart Consultant feel free to contact me either on this blog or via my website HERE

Thanks so much for dropping by to check out my latest project ideas. I'm really interested to hear what you think about them, so I'd love you to leave a comment before heading off to the next stop on our Australasian Blog Hop which is Shaunna Richards: Passionate About Pages. I hope you leave a lovely comment on all the blog posts and come back around to mine. See you again soon.

Vandra Stenton, Close to My Heart Consultant, Perth Western Australia

Thursday, 16 August 2018

Purposeful Plastic - CTMH Technique Blog Hop

#CTMHVandra, #ctmhDocumented, Documented, blog hop, Flip Flap, Wedding, cardmaking, wooden, PML, picture my life, stamping, shimmer trim, Workshops Your Way,

This Purposeful Plastic CTMH Technique Blog Hop will be incorporating Flip Flaps, Pocket Plus Pages/Plus in our artwork in a creative and fun way to show their valuable uses. This is my first time joining this Technique blog hop group and I'm very happy to be part of it because its an international group and I am in Australia, with lots of my sister consultants in this blog hop in the US and Canada.  If you have arrived here from Kimberly Bower then you are in the right place. If you landed here another way, please join in by following the link at the end of this post. Follow the links, check out all the amazing ideas for using and eventually you'll come right back here to where you started.

For my artwork I decided to use Flip Flaps™ Memory Protectors™ 3" × 4"
and I used the side fold flip flap. I used the PML cards from the Workshops Your Way® Documented Scrapbooking Kit or the Documented Paper PacketThe stamp I used is from the Workshops Your Way® Sweet Friends Cardmaking Kit which is also in the CTMH Documented range. 

#CTMHVandra, #ctmhDocumented, Documented, blog hop, Flip Flap, Wedding, cardmaking, wooden, PML, picture my life, stamping, shimmer trim, Workshops Your Way,

I stamped the "Wishing you the" and "Today & always" titles in Black and the "best" in New England Ivy Exclusive Inks™ Stamp PadThe leaves in the New England Ivy and the Flowers in Eggplant Exclusive Inks™ Stamp Pad I stamped upside down on the Details PML 3x4 card and to hide the "details" I covered it with Gold Shimmer Trim.

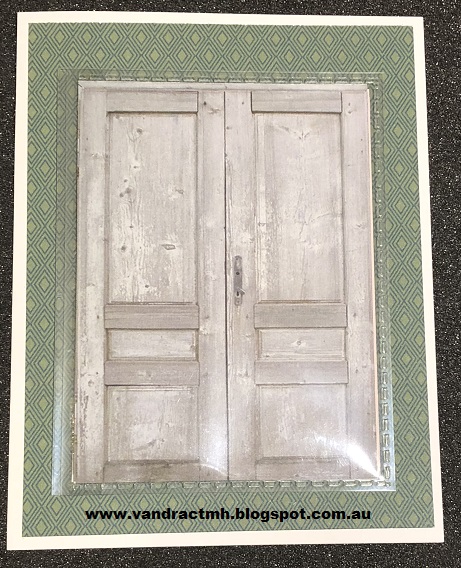
I really love the double doors PML 3x4 card and that was to be my front for the card. The Green diamond paper is from the Documented paper pack and then I stuck the 3x4 Flip Flap onto the 4 x 5.25 inch card front on the White Cards & Envelopes Value Pack card. I cut a 3x4 piece of the purple spot paper from the Documented paper to put on the back of the door inside the flip flap. Then I lined up very carefully the stamped sentiment PML card (pictured above) and stuck it over the top of the plastic flap adhesive and the backing paper. 

#CTMHVandra, #ctmhDocumented, Documented, blog hop, Flip Flap, Wedding, cardmaking, wooden, PML, picture my life, stamping, shimmer trim, Workshops Your Way,

The above picture shows the card front with the flip flap closed.  
#CTMHVandra, #ctmhDocumented, Documented, blog hop, Flip Flap, Wedding, cardmaking, wooden, PML, picture my life, stamping, shimmer trim, Workshops Your Way,

This picture shows the card opened and the video underneath shows how it opens and shuts. 

I think it would make a great wedding or Engagement card as the door symbolises going opening the door to a new life. 


Thanks so much for dropping by to check out my latest project idea. I'm really interested to hear what you think about my flip flap door card, so I'd love you to leave a comment before heading off to the next stop on our Technique Blog Hop which is Melissa Robinson I hope you leave a lovely comment on all the blog posts and come back around to mine. See you again soon.

Vandra Stenton, Close to My Heart Consultant, Perth Western Australia

Sunday, 10 July 2016

Magical Australasian Blog Hop


Welcome to our Australasian Close to My Heart Blog Hop featuring this months featured pack called Workshops Your Way™ Magical Scrapbooking Kit.

If you have arrived here from Megan Lawrence at Crop Craft Create then you are in the right place. If you landed here another way, please join in by following the link at the end of this post. Follow the links, check out all the amazing ideas and eventually you'll come right back here to where you started.

We are all creating with the Workshops Your Way™ Magical Scrapbooking Kit.
This kit is featured by Close to My Heart in July and is until the end of the current Seasonal Expressions Ideas Book (so will be retiring at the end of August 2016). NOT LONG!!

There are pages, cards and Picture My Life layouts featured in this pack. I made the pages as directed and cut the cards and then I mixed them up a bit by changing around the backs and fronts of some of the papers to create different and unique cards. Below shows what you can do by varying how you piece the papers onto the cards. 


I really love this stamp set called Fairytale Birthday - I can see myself using it lots and lots. 


The next thing I did with the pages was complete them and then continue with photos I had in the series, to make this page below. 

I had lots of photos of a ball fun pit air-cannon area at Dream World on the Gold Coast so made a page using them. 

I dotty paper on the bottom of the page is the 4x6 picture my life cards from the pack that I cut in half longways so they are 6 x 2 inches. Then I used the Zip Strips and one of the Picture my life card thats "love this" with a strip cut off the bottom and stuck on the other page. 

To cover the joins on the pages I used Honey Cardstock and Stamped black ink on White Daisy Cardstock using the Amusement Park stamp set, I adhered them with 3-D Foam Tape. I stamped the tickets as journalling boxes and will write in them later. 


I was really happy with the dots for the plastic ball cannon area because it suited them so perfectly. I finished it off with a few of the Magical Complements 
for a little bit of dimension. 

This month is also the LAST MONTH OF the Annual Expressions Catalogue. Go to mwebsite or your consultants website to see all the exciting products available BEFORE THEY'RE GONE FOREVER!! (yes I'm being dramatic - I don't want anyone to miss out!!!). 

Thanks so much for dropping by to check out my latest project, I hope you get inspired. I'm really interested to hear what you think about it, so I'd love you to leave a comment before heading off to the next stop on our Australasian Blog Hop which is Lauren Moore - CTMH Craftings.
  Come back to see me again soon.

Friday, 1 April 2016

Life In Pictures April SOTM Australasian Blog Hop

We have all been creating with "Life in Pictures—April 2016 Stamp of the MonthStamp set.  If you have arrived here from Doris Taylor Creative Inspirations then you are in the right place. If you landed here another way, please join in by following the link at the end of this post. Follow the links, check out all the amazing ideas and eventually you'll come right back here to where you started.


Today I would like to share with you my project which features the Life in Pictures—April 2016 Stamp of the Month available exclusively throughout April 2016 for $27 or for just $7.50 when you spend $75. This is a Camera Enthusiasts dream of a stamp set and is perfect for colouring in or painting with or like I have done, kept it black and white. 

I pulled out my Workshops Your Way™ Penelope Scrapbooking Kit and cut two bases at 3.75 x 5 inch out of the Blue dots sheet of B&T paper using my SureCut™ Deluxe Craft Paper Trimmer.
Penelope Workshops Your Way kit
Penelope Paper Pack (inside the Workshops your way Kit)

Then I cut out one of the Picture My Life cards (the blue flowers card) which are 3x4 inches again using the SureCut™ Deluxe Craft Paper Trimmer. The two blues sort of blended together so I ran each of the edges of the two papers, over my Black Exclusive Inks™ Stamp Pad in a swiping motion and gave them some outlined definition. 

I stamped the Large Camera on 12" X 12" White Daisy Cardstock and the title SMILE! from the Life in Pictures—April 2016 Stamp of the Month in Black Exclusive Inks™ Stamp Pad and fussy cut them out with my Non-stick Micro-tip Scissors.

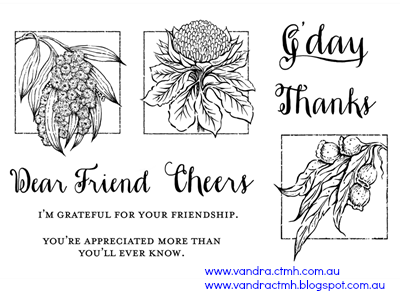
Then I stamped the "You're Appreciated more than you know." stamp from the Australian Thanks stamp set in in Black Exclusive Inks™ Stamp Pad on 12" X 12" White Daisy Cardstock and fussy cut it out with my Non-stick Micro-tip Scissors.

I attached all the bits together with Duck® Easy Stick™ Adhesive 
and I was really happy with the finished result. 


I had cut two of the blue dots 3.75 x 5 inch paper from the Workshops Your Way™ Penelope Scrapbooking Kit so I made an extra card using a cricut cut out shape from the Cricut® Art Philosophy Collection that I had leftover from a previous project, cut from 12" X 12" White Daisy Cardstock. I had already fussy cut out the camera, with my Non-stick Micro-tip Scissors that I had stamped with Black Exclusive Inks™ Stamp Pad on 12" X 12" White Daisy Cardstock

To finish off the card I added the Black & Gold Ribbon that I adhered with Memory Book Mini Glue Dots™I added the lovely "You're appreciated more than you'll ever know." title from the Australian Thanks stamp set to the top of the card stamped in Black Exclusive Inks™ Stamp Pad directly on the blue patterned paper from Penelope. 


Remember this great stamp set  Life in Pictures—April 2016 Stamp of the Month is only available throughout April from my website or from your Close to My Heart Consultant

Thanks so much for dropping by to check out my latest project, I hope you get inspired to create something with this Camera enthusiasts stamp set this month. I'm really interested to hear what you think about it, so I'd love you to leave a comment before heading off to the next stop on our Australasian Blog Hop which is Shaunna Richards Passionate About Pages.

  Come back to see me again soon.