Sunday, 8 February 2015

February Album Special


A TREAT JUST FOR YOU! - ALBUM ALLURE SPECIAL
Some albums are Ruby, others are Lagoon... they are ALL buy one get one half off!

During the month of February, when you purchase one of Close To My Heart's alluring coated canvas albums you will be eligible to receive a second album of your choice at half price. That is a savings of over $22 AUD / $27 NZD! These albums are available in a gorgeous variety of colours and patterns in both post-bound and D-ring styles-perfect to pair with traditional, Studio J®, or pocket scrapbook layouts. 

This offer is only available while supplies last, so make certain to get your order in early to ensure you can choose the styles and colours you love. They're going fast and are built to last; so don't delay - place your order HERE = www.vandra.ctmh.com.au

The D-Ring albums make an awesome "Album in Progress" style album which you can use to put your completed album pages in while you complete the whole project. 

There are lots of options to pair with the album coversets in terms of pages, in a variety of styles. Some to fit full page tradtional scrapbooking or studio J pages in either top or side loading. Or memory protectors in 5 different designs to fit 4x6 and 3x4 sized photos in a variety of styles. You can also get a variety value pack

Album Accessories


Check them all out and tailor your album to your own needs. 


Sunday, 1 February 2015

A Happy Hello - February Stamp of the Month Australiasian Blog Hop

Hello and welcome to our Stamp of the Month Australasian Close to My Heart Blog Hop. We have all been creating with "A Happy Hello" Stamp set. If you have arrived here from Georgia O'Shea - Georgia Creates then you are in the right place. If you landed here another way, please join in by following the link at the end of this post. Follow the links, check out all the amazing ideas and eventually you'll come right back to where you started.
 
Today I would like to share with you my card which features the A Happy Hello – February 2015 Stamp of the Month available exclusively throughout February for $27 or for just $5 when you spend $75. 

This is such a pretty stamp set that has so many beautiful applications. I can't wait to see what all the blog hop girls have made. I made my card for a consultant swap day a few weeks back, I made 12 of these cards and they are simple to do in bulk.
I used 12" X 12" Kraft Cardstock as the background and to stamp the flower using Cranberry Exclusive Inks™ Stamp Pad. I fussy cut out the flower with my Non-Stick Micro-Tip Scissors.
I cut half inch of White Daisy Cardstock for the penants and stamped the wonderful title from the You're the Bomb Operation Smile Fundraiser stamp (which is only available until 31st March 2015) using the Sorbet Exclusive Inks™ Stamp Pad

The circle "You're" from the You're the Bomb Stamp set fitted perfectly inside the flower so I stamped it with the Sorbet Exclusive Inks™ Stamp Pad and then the trick is to cut it out with the 1" Circle Punch after stamping. Its easier to line it up to punch after stamping, instead of trying to stamp on a small circle. 
 I stamped the stem/leaves with Flaxen Exclusive Inks™ Stamp Pad 
I hung the stamp over my 2" X 3 1/2" My Acrylix® Block to just use some of the stem.
Note: when I stamped with the flaxen it was darker but as it dried it went lighter on the Kraft Cardstock. If I was to make this card again I would stamp the stem a second time, darkening the stem.  

When I placed the cranberry flower on the craft cardstock it didn't stand out enough so I put a white square underneath.To finish it off I added a puffie from the Chalk It Up Assortment.
Remember the pretty stamp set  A Happy Hello – February 2015 Stamp of the Month is only available throughout February from your Close to My Heart Consultant

Thanks so much for dropping by to check out my latest simple project. I'm really interested to hear what you think about it, so I'd love you to leave a comment before heading off to the next stop on our Australasian Blog Hop which is
Mandy - Hall of Indulgence, See you soon!
 

Friday, 23 January 2015

Wrapping Paper

I am excited to share some cool wrapping paper and a card that I made this week for my nephews 5th birthday. I love this idea of having an endless variety of personalised wrapping paper.

I bought some cheap brown paper on clearance after Christmas at a big chain store for $1 per roll which is 7m x 70cm wide. I bought 5 rolls and then went back and bought a few more cause I want to be able to do this for every gift I give. You can't probably get it that cheap at the moment but keep an eye out, lots of places do sell it and places like Ikea sell white paper on a role too.

I decided to let my daughter (who is a mad keen stamper) do the wrapping paper while I worked on the card. I set her up with the Fast and Furious stamp set (she choose which vehicles she wanted to use and which colours).
This stamp set is such a fabulous set for young boys (and the young-at-heart boys). My daughter chose Cranberry Exclusive Inks™ Stamp Pad, Lagoon Exclusive Inks™ Stamp Pad and Honey Exclusive Inks™ Stamp Pad. She then random stamped all over the paper, which we had cut to size of the present by loosely wrapping it around the present first. 

Note: When getting my 6yr old to stamp I put the cars on the 3x3inch block and then realised that putting them diagonally on the block meant she was able to stamp more evenly than if the cars were at one edge of the block.


I started the card by deciding to make a Pop-Up card from the Cricut® Artfully Sent Cartridge.
On page 28 there is a pop up card that is designed to have the little aliens on it. I just cut the pop-up insert at 5 inches with the shift key on (as per the instructions) but did not cut the aliens :)


I picked a blue cardstock from my pile of Whimsy Cardstock Combo Pack and cut out the pop up design. To follow with the recycled brown paper look I chose 12" X 12" Kraft Cardstock to create the outside of the card and stamp the three matching vehicles as my daughter had chosen for her paper. 


In the centre of the paper and the centre of the card I stamped my nephews name in Urban Alphabet font stamps and Black Exclusive Inks™ Stamp Pad.

 After I had stamped on the front of the card with the same colours as the wrapping paper, I stamped one set on scrap Kraft Cardstock and cut them out, leaving the bottom of the cut out stamps fairly flat for the pop-up. 

 I stuck on the vechicles on the pop up sections of the card with 3L® E-Z Dots® Adhesive and used that same adhesive to stick the insert down to the outer card.


I was very happy with the finished product and think that it made a nice co-ordinated personalised gift wrapping. I hope I have given you some inspiration for your next gift giving opportunity.

I was originally inspired to make wrapping paper when a friendly sister consultant Laura Beacham shared some cute paper she had made with a matching card using the cutest Love Ya Silly stamps and the Operation Smile Fundraiser stamp set You're the Bomb to make the balloon (turning the bomb upside-down). She used the paper Paper Fundamentals Adventure Assortment and 12" X 12" Black Cardstock with Honey Exclusive Inks™ Stamp Pad and Black Exclusive Inks™ Stamp Pad.

Thanks Laura for permitting me to show your cute work on my blog, I love your little cute party alien/monsters.


Made by Laura Beacham - used with permission.

Made by Laura Beacham - used with permission.

Friday, 16 January 2015

You're the Bomb Operation Smile Blog Hop


Welcome to our Australasian Operation Smile Blog Hop. Welcome to those that arrived from Anne's Blog - Mummy you made this? or those that came from another place, please continue to follow along to see all the blogs in the loop until you get back to where you started.

Close To My Heart is partnered with Operation Smile®, a private, Not-for-profit organization that provides free, life-changing surgery that repairs smiles and reshapes lives, one child at a time.
 
Today we will be sharing some inspiration using the "You're the Bomb" C sized stamp set which is featured on the back page of our Seasonal Expressions Idea Book.
By purchasing this set at full retail price of $21 you can help change the life of achild as CTMH will donate $US3 from your purchase to Operation smile from now until 31st March 2015.


I love this stamp set as it has such a positive vibe about it. You can create cards and pages that are so positive, uplifting and encouraging. I decided that I wanted to make some small Random Acts of Kindness Cards, to follow my blog's theme from last week. These 3x3 cards are designed to be in your handbag at all times to give to people you see in your travels, especially those that do wonderful things for you. For example to thank a waitstaff person who serves you at a cafe or restaurant; To thank a cleaner in a shopping centre or food hall; To thank an assistant at a shop who is very helpful with helping you try on clothes; to thank someone who looks after your kids during the holidays or to thank someone who does something really wonderful for you (there are no limits). You can grab them out of your bag and quickly write a note, you can include their name (if you know it or if they have a nametag) or just leave it as a quickly scribbled thanks for the great service you gave me today, you are wonderful/fabulous/awesome. This will make someone's entire day! Lots of people in the service industry don't get thanked often, so they will treasure these small cards. 

These are my cards.

INSTRUCTIONS:
To start my 4 cards I cut a sheet of 12" X 12" White Daisy Cardstock in half 6 inches x 12 inches and then cut 3 inch stripes so I had my card bases 3x6 inches. I used the Score Board with the included Bone Folder to fold them into little 3x3 cards. I then took a peice of 12" X 12" Glacier Cardstock into strips 2.75 inches wide and then cut them into squares 2.75 x 2.75". I used offcuts of White Daisy Cardstock to create the titles and the accents using Glacier Exclusive Inks™ Stamp Pad and Black Exclusive Inks™ Stamp Pad and fussy cut them out with my Non-Stick Micro-Tip Scissors. 

The glacier cardstock was embossed (see below for the individual folders I used for each one), then the edges were run along the Black Exclusive Inks™ Stamp Pad, in a sweeping motion, to create that rustic edge. The Glacier cardstock was adhered to the card bases with 3L® E-Z Dots® Adhesive. The white title got the black ink edging (as above), most were dove-tailed with the Non-Stick Micro-Tip Scissors. Then the title and embellishments were stuck on using Thin 3-D Foam Tape to get a little bit of dimension. To finish it all off I grabbed some 3" X 3" White Daisy Envelopes and stamped them with the Glacier Exclusive Inks™ with the heart design, to create a lovely little set of 4 cards.
 
 I used the Floral Embossing Folder for the Awesome card (all other directions above).

  
I used the new Heart Embossing Folder for the Fabulous Card (all other directions above).
 
 I used the Quatrefoil Embossing Folder for the Incredible Card (all other directions above).

 I used the Dot Embossing Folder for the Wonderful Card (all other directions above).


The blog hop is a loop so follow along and you will end up right back here. To learn more about Operation Smile and the involvement Close to my Heart has with this important work keep reading below, otherwise, pop over and see what
Doris - Creative Inspirations has created.
 

Close to my Heart have been supporting Operation Smile since 2008, and during that time have supported Operation Smile to change the lives of over 1,500 children and their families. 


As the Australian CTMH Business is only 18 months old we are new to Operation Smile and my first real experience learning about Operation Smile was at our Annual Convention 'Artistic Adventure' in Brisbane in October 2014. These photos are slides from that talk. Hearing that 1 in 10 children who is born with a cleft lip or palate dies before their first birthday was a massive wakeup call. In Australia these conditions can be repaired quickly and easily and are not usually fatal, in developing countries it is another matter.


During the presentation we were given an insight into what one of these medical missions entailed with the story of our Vice President Brian Holman sharing his experience and photos of a mission he went on.

Before the surgery, a little boy that touched Brian's heart. Notice the T-Shirt on Brian that says "Close to my Heart makes me SMILE!".
As Brian is not a medical person he went as a support person and a lot of his role was supporting the families and entertaining the children while they were waiting for their surgeries. It was a very moving talk hearing about the difference that this sort of surgery makes to these childrens lives. It only takes $275 (AUS dollars) to pay for 1 child to have their surgery. Go to the Operation Smile Australia website for further details http://australia.operationsmile.org.The difference in the lives of these children and their families was amazing. I was very moved to support this charity through my Close to My Heart Business.

After the surgery, Brian gave the mother his T-shirt after forming a bond with her and her little boy.

Thanks for joining me on this journey, I look forward to supporting this organisations and I am very happy that we can all give a small part by buying and using this adorable stamp set. 

The “You’re the Bomb” stamp set is available from your CTMH consultant and $3USD from every purchase will go directly to Operation Smile until the end of March. You can also choose to make a donation of any size directly to your consultant, donations over $2 are tax deductable. To continue your journey, hop over to see what Doris - Creative Inspirations has created.

Friday, 9 January 2015

Blogging once a week & Kindness

So one of my goals for 2015 is to do some blogging on my business every week. I am going to highlight ideas, showcase products, give you something every week to get you inspired in your own projects. I am not going to pick a specific day cause I don't want to give myself too much pressure but a few days grace either side! This is my second week of blogging and my third post of the year. I'm on track so far. I hope I can keep it up.

So this week I'm going to highlight something really nice you can do for a friend as part of a #365daysofkindness idea (see my sisters Blog http://365days-of-kindness.blogspot.com.au/) or her 365 Days of Kindness Facebook Page that I help administer for more kindness ideas.

One thing that is nice to do is to send a friend a card, saying "thanks" or "Happy Birthday" or "I'm thinking of you".

Then for someone (as something extra special) you can send/give your friend a bunch of blank cards so they can send them on to their friends and family. Its a really nice way to pay it forward.

I did this for a friend as a gift recently. These are some of the cards I gave to her (I gave her 8 in total), some using older items from my stash, but you can get lots of them youself by checking my website in the "While Stocks Last" Section that is only available to purchase from my website www.vandra.ctmh.com.au. There is also a new "retiring soon" section of the online shopping section that shows items that are going to be retiring soon. You might want to check that out so you don't miss out on anything. I really enjoyed making these cards so I hope you enjoy seeing them. 

Have a Lovely Day card uses;
Colonial White Die-Cut Cards & Envelopes WSL
Party Washi Tape 3-Pack WSL
Pink Shimmer Trim
Lovely Birthday Stamp Set
with Crystal Blue Exclusive Inks™ Stamp Pad and Smoothie Exclusive Inks™ Stamp Pad
Paper Fundamentals Whimsy Assortment 
Junebug Puffies 
12" X 12" Colonial White Cardstock
3L® E-Z Dots® Adhesive


Hello card uses;
Colonial White Die-Cut Cards & Envelope WSL
This Moment – January 2015 Stamp of the Month with Black Exclusive Inks™ Stamp Pad
Washi Tape (retired but click link for current washi tapes)
Black Shimmer Trim 
Non-Stick Micro-Tip Scissors 
Round Sponge with Crystal Blue Exclusive Inks™ Stamp Pad
Staples regular sized because I temporarily couldn't find my Mini Stapler 


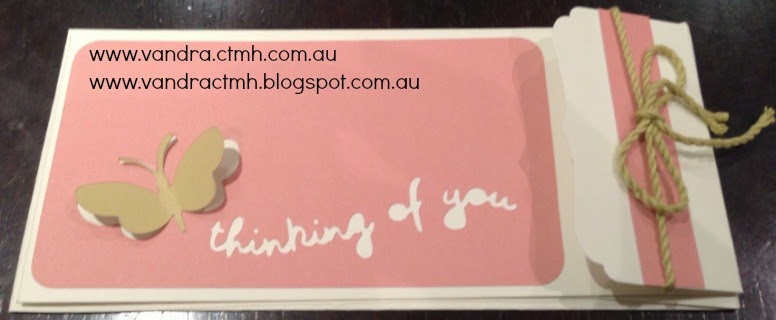
Long Thinking of You card uses;
Colonial White Die-Cut Cards & Envelope WSL
Cricut® Artfully Sent Collection 
12" X 12" Sorbet Cardstock  
12" X 12" Flaxen Cardstock 
SureCut™ Deluxe Craft Paper Trimmer  
Corner Rounder  
Flaxen Extra Thick Twine  
Bonding Memories™ Glue 
Memory Book Mini Glue Dots™   (to hold the bow in place)


 Thinking of You small card uses; 
Cricut® Artfully Sent Collection (cut out from previous card)
12" X 12" Sorbet Cardstock 
12" X 12" Colonial White Cardstock
12" X 12" Kraft Cardstock 
SureCut™ Deluxe Craft Paper Trimmer
Bonding Memories™ Glue
Purple Glitter Gems
Retired Chantilly Paper (see HERE for other patterned paper).  


Thanks for stopping by my blog. Please leave me a comment to let me know what you think of some of my latest cards and come back again soon!! Remember the fabulous specials in January 2015 (see previous blog post for details). If you have any questions on how I made these cards please ask and I will explain as best I can.