Showing posts with label pop-up. Show all posts

Friday, 15 April 2022

Colour Dare #492 Tic-Tac-Toe In Full Bloom

#CTMHVandra, Colour dare, Birthday, cardmaking, stamping, cars, trucks, pop-up, road, stop, fun, technique, retired, commission,

Our Colour Dare Challenge for #492 is the colours of the In Full Bloom Scrapbooking Workshop Kit in a tic-tac-toe grid - Black, White and Grey are Free to use. When you are creating for more than one challenge please make sure your project meets our requirement. Most importantly - have fun!  Go to the link for Colour Dare #492 and add your entry. When you submit your entry you must provide a link to your post, not just to your blog in general. There are LOTS of ways to enter either a Blog Post or post to an online gallery (Facebook, Pinterest, SplitCoast Stampers, or Instagram).


I needed to make a card for a young boy in my local buy nothing group who I offered to make a card for so I chose colours suitable for a little boy turning 3. I chose the left hand side down with Lagoon Cardstock, Sundance Cardstock and Lemonade Cardstock. 

I pulled out an old stamp set in my stash called Fast & Furious after Dad told me little Master 3yr old likes trucks and diggers. 

#CTMHVandra, Colour dare, Birthday, cardmaking, stamping, cars, trucks, pop-up, road, stop, fun, technique, retired, commission, B1288, Fast and Furious,
RETIRED STAMP SET

I also recently did some training with this style stamping as shown below. That was the inspiration for this weeks colour dare.
Its a fun technique where you stamp the white sections together to get the lovely split stamp. 
#CTMHVandra, Colour dare, Birthday, cardmaking, stamping, cars, trucks, pop-up, road, stop, fun, technique, retired, commission,
So I decided to do a multi-coloured version on a 6x6 sized card. I cut the Mink Cardstock into 6x12 and folded it as the base and this is my cutting guide. 

Mink - 6 x 12, 5 x 5, & 4.25 x 4.25
Lagoon - 5.75 x 5.75
Sundance - 4.75 x 4.75
Lemonade - 4x4 
(I probably should have done Lemonade a little smaller to fit the pattern better)

I used a tiny bit of adhesive to tack the coloured cardstock together and got my Black Exclusive Inks™ Stamp Pad and stamped the tucks and car OVER the edges. I also stamped the 3 from a retired set called Solo's we had B1288.

#CTMHVandra, Colour dare, Birthday, cardmaking, stamping, cars, trucks, pop-up, road, stop, fun, technique, retired, commission,
RETIRED STAMP SET

The idea is to stamp over the edges even though it creates a little section where the ink can't reach. This is covered later. 

#CTMHVandra, Colour dare, Birthday, cardmaking, stamping, cars, trucks, pop-up, road, stop, fun, technique, retired, commission,

Part of this technique is to stamp over the edges which leaves a little bit right next to each layer blank. That is the purpose of filling with the Mink layers later. 

#CTMHVandra, Colour dare, Birthday, cardmaking, stamping, cars, trucks, pop-up, road, stop, fun, technique, retired, commission,

I only used 3 vehicles because young boy was turning 3. Then put the non-stop fun stop sign in the corner. 

#CTMHVandra, Colour dare, Birthday, cardmaking, stamping, cars, trucks, pop-up, road, stop, fun, technique, retired, commission,
Close up shows the edges. Below shows how nothing much shows when you pull all the coloured sections apart. It all looks a mess but its a puzzle that works again when put together. 
#CTMHVandra, Colour dare, Birthday, cardmaking, stamping, cars, trucks, pop-up, road, stop, fun, technique, retired, commission,
Then I layered the Mink in between each of the layers and stuck them back together. 

#CTMHVandra, Colour dare, Birthday, cardmaking, stamping, cars, trucks, pop-up, road, stop, fun, technique, retired, commission,

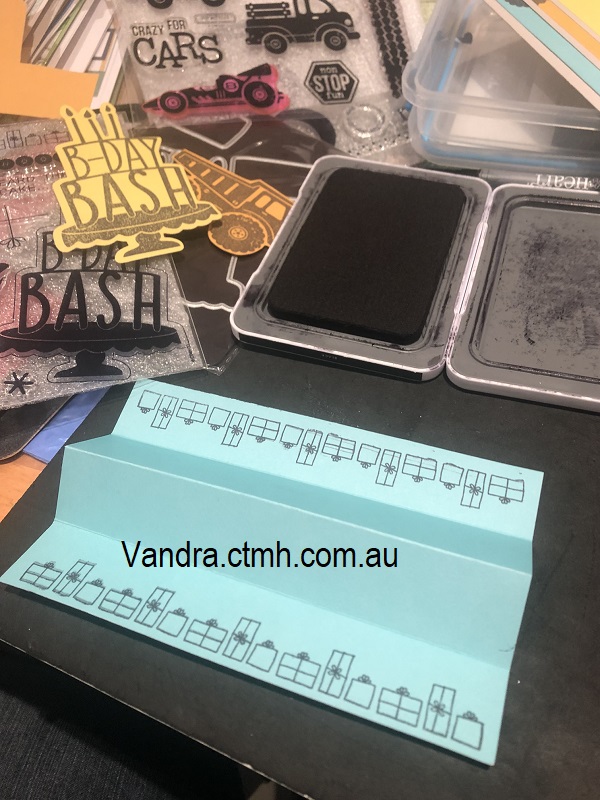
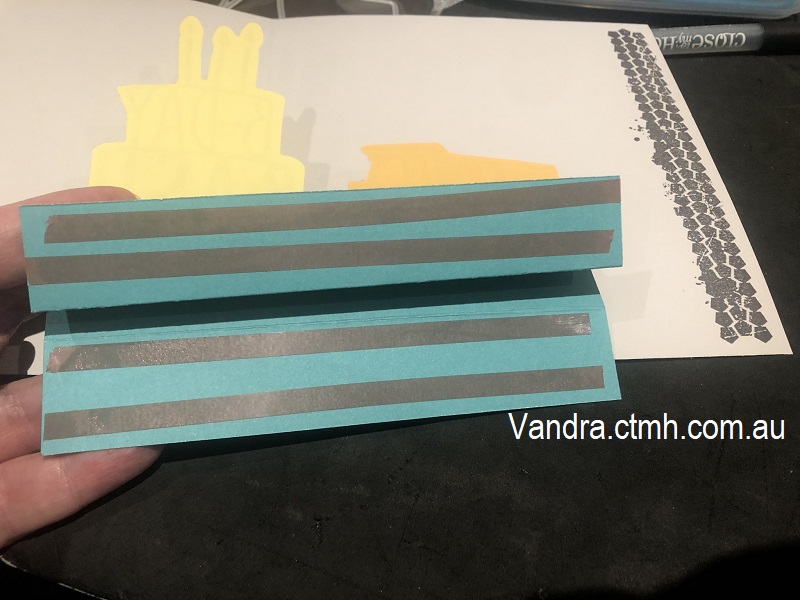
Inside I wanted to do a pop up so I cut a bit of lagoon cardstock at 4 inches wide by just under 6 inches long (it was a scrap that fit so I didn't measure). I scored at each inch along the section and folded up in the middle and down on the sides... valley fold on the sides and mountain fold in the centre. Then I decided to stamp the presents on each side from the Cake Day—Scrapbooking Stamp + Thin Cuts. Note to self: Stamp on this part BEFORE folding... stamping on a folded piece is not easy!

I also used Cake Day—Scrapbooking Stamp + Thin Cuts to cut the cake in Lemonade cardstock and stamp in black ink. Then I cut one of the candles off (only 3 candles required). Then I decided to do a cake on both sides so did a second one and cut off a different candle on the reverse side. 
#CTMHVandra, Colour dare, Birthday, cardmaking, stamping, cars, trucks, pop-up, road, stop, fun, technique, retired, commission,
I adhered the pop up lagoon section with my favourite strong bond adhesive tape simply called Adhesive Tape. (see above, it has a red layer that you pull off when ready to adhere). 

I also added a dump truck in Sundance - fussy cut out. 

#CTMHVandra, Colour dare, Birthday, cardmaking, stamping, cars, trucks, pop-up, road, stop, fun, technique, retired, commission,
It cast great shadows. 
#CTMHVandra, Colour dare, Birthday, cardmaking, stamping, cars, trucks, pop-up, road, stop, fun, technique, retired, commission,

The truck didn't really match but didn't look too bad and I cut the candles to show each side only having three candles. 

On the below side I also stamped the "Hooray! Hooray!" stamp on there (prior to sticking the items). I made sure adhesive only on the bottom of the first side and on second side only to place it where the stamps are touching so no adhesive sticking out. If I made a mistake I could correct with Anti-static Pouch to remove stickiness. 

 #CTMHVandra, Colour dare, Birthday, cardmaking, stamping, cars, trucks, pop-up, road, stop, fun, technique, retired, commission,

Finished off the inside with the tire tread stamp set and White Gel Pens drawn on the front to create a road. 

#CTMHVandra, Colour dare, Birthday, cardmaking, stamping, cars, trucks, pop-up, road, stop, fun, technique, retired, commission,


 Thanks so much for dropping by to check out my latest project. Hope you can join in the Colour My Heart Colour Dare Challenge #492. I'm really interested to hear what you think about my project, so I'd love you to leave a comment. See you again soon, subscribe to my blog so you don't miss a challenge.

If you don't have a Close to My Heart Consultant (and you're in Australia) feel free to contact me either on this blog or via my website HERE.
Vandra Stenton, Close to My Heart Consultant, Perth Western Australia

#CTMHVandra, color dare, Cricut Design Space, #ctmhasyougrow, cricut, Jennifer Maker, Flower Market, Birthday, papercraft, 3D, Kraft, gold, gifts,


Friday, 29 May 2020

Colour Dare #396 Choose three colours

#CTMHVandra, #ctmhstitchedtogether, Birthday, cardmaking, pop-up, fancy card, stitched thin cuts, thin cuts, stamping, 3D, computer, laptop, desk, bunting, dots, color dare, Colour Dare Challenge,
Our Colour Dare Challenge for #396 is to choose at least 3 of the colours above. Plus Black, White and all neutrals greys are free to use. You are invited to participate in this challenge too. Go to the link for Colour Dare #396 and add your entry. 

The colours I chose to use were Linen, Charcoal, Peacock and Mint. I decided to make something a bit fancy for my son for his 16th birthday. He knew he was getting a laptop for his birthday but we hadn't purchased it yet so there was no present to unwrap. I wanted him to have a special card to open. When he opened it he was VERY impressed. I am glad to say he really did appreciate my extra efforts to make him this card. I'm so glad he knew I had gone to a special effort for him. 

#CTMHVandra, #ctmhstitchedtogether, Birthday, cardmaking, pop-up, fancy card, stitched thin cuts, thin cuts, stamping, 3D, computer, laptop, desk, bunting, dots, color dare, Colour Dare Challenge,

I found a template on Pinterest and then had to come up with measurements myself. The original ideas was found here. This was my working out :) it was messy :)

#CTMHVandra, #ctmhstitchedtogether, Birthday, cardmaking, pop-up, fancy card, stitched thin cuts, thin cuts, stamping, 3D, computer, laptop, desk, bunting, dots, color dare, Colour Dare Challenge,

I started with Linen Cardstock and cut the card 7 inches x 10 inches to get a 7x5 inch card base. My Charcoal Cardstock was cut at 5 inches by 6.5 inches - then I scored it at 2 inch increments with a half inch slot extra for tabs. Then I cut a 2inch wide gap. I scored this on the dark side of the charcoal and then cut drawer fronts from the light side of the charcoal. The drawers were half inch high by 1.25 inches wide and the middle one was 2 inches wide. I sponged the edge of the Charcoal Cardstock drawers with Charcoal Exclusive Inks™ Stamp Pad.

Then I finished off the drawers with white dots from the Black & White Dots. To make my laptop I cut squares of  Peacock Cardstock and used a corner rounder to round the edges of the "laptop". Then Cut a Linen Cardstock smaller square and rounded it. 

I stamped Peacock Exclusive Inks with an older birthday stamp which had numbers and birthday stamps. I freehand cut a "mouse" and curled it over and added a tiny dot of 3D foam tape to have the laptop mouse be 3D. I drew with a black pen some lines for the mouse and some lines for the keyboard (very roughly). 

Adhering it all to the linen carstock. I added a back ground from the 
Stitched Together Paper Packet  the mint dots. Then I cut a Mint Cardstock large circle for the "mat". To make the banner I freehand cut triangles and stuck them on with 3D foam tape and Mink Twine with smaller white dots from the Black & White Dots.
#CTMHVandra, #ctmhstitchedtogether, Birthday, cardmaking, pop-up, fancy card, stitched thin cuts, thin cuts, stamping, 3D, computer, laptop, desk, bunting, dots, color dare, Colour Dare Challenge,


#CTMHVandra, #ctmhstitchedtogether, Birthday, cardmaking, pop-up, fancy card, stitched thin cuts, thin cuts, stamping, 3D, computer, laptop, desk, bunting, dots, color dare, Colour Dare Challenge,

On the front of the card I used Block Alphabet Thin Cuts and number thin cuts and cut out the Peacock cardstock. Then I used the Stitched Circles Thin Cuts cut out of the same Stitched Together Paper Packet. Put up on 3D foam tape.


 I then used the Happy Birthday thin cut and created a second card front for a second card front, sticking each tiny bit inside. I love getting two for one. 

#CTMHVandra, #ctmhstitchedtogether, Birthday, cardmaking, pop-up, fancy card, stitched thin cuts, thin cuts, stamping, 3D, computer, laptop, desk, bunting, dots, color dare, Colour Dare Challenge,

Thanks so much for dropping by to check out my latest project. Hope you can join in the Colour My Heart Color Dare Challenge #394 too. I'm really interested to hear what you think about my card, so I'd love you to leave a comment. See you again soon. If you don't have a Close to My Heart Consultant (and you're in Australia) feel free to contact me either on this blog or via my website HERE. 
Vandra Stenton, Close to My Heart Consultant, Perth Western Australia

Wednesday, 20 July 2016

Last Chance CTMH Annual Inspirations Australasian Blog Hop


Welcome to our Australasian Close to My Heart Blog Hop, we are all sharing our favourite things from the Annual Expressions Catalogue that is just about to finish up at the end of this month!! PANIC STATIONS... Last chance ordering!! Most of these things you won't be able to get after this month!! So many exciting new things are coming but so many things have to go to make room for the new things. Don't worry you can still get them if you are QUICK!

If you have arrived here from Doris Taylor Creative Inspirations then you are in the right place. If you landed here another way, please join in by following the link at the end of this post. Follow the links, check out all the amazing ideas and eventually you'll come right back here to where you started.

Some of my favourite things that are retiring and that I love are the embossing folders and some of the shimmer trim (pink, blue, teal, bronze and purple). There are new and exciting embossing folders coming in the new catalogue but you need to get all the others before they're gone. There is a section on our websites that show Going Soon Products which is a great place to check out. The new catalogue has lots of new ribbons coming but no new shimmer trim, so hopefully we will get some next year, in the meantime I have been teaching my customers to paint their shimmer trim with watercolour paint. 

The below gift card I made with one of the retiring embossing folders called - Quatrefoil Embossing Folder and my favourite retiring colour "Cotton Candy". A lot of the colours in the Adventure range are changing so many of those colours are retiring to make way for new vibrant colours. 
The card is just a 4x4 square of 12" × 12" White Daisy Cardstock and then a pop up was cut, the 2x4 bit of 12" × 12" Cotton Candy Cardstock was embossed and then stuck on the front. I stuck the flowers on the top of the embossed card with 3-D Foam Tape. I painted with Watercolor Paints and Waterbrush—Small Round and Waterbrush—Medium Round. 


The next card I made to show the beauty of the Circle Diffuser and the Scallop Embossing Folder. I demonstrated this at our recent retreat and everyone was rather impressed. I finished it off with some White & Gold Ribbon, a sentiment from Fairytale Birthday and some 12" × 12" Pacifica Cardstock. I used Memory Book Mini Glue Dots™ to adhere the ribbon to the white daisy cardstock. 


At the retreat I also showed everyone some ideas using thin cuts (as per the first card) and the below little card was a favourite with Ornate Blossoms & Ornate Blossoms Thin Cuts coloured with ShinHan Markers (Thin Cuts aren't retiring for 1 more month). I finished my card off with retiring Shimmer trim x2. Every card or project needs BLING and Shimmer trim is the perfect accompaniment to any project!! The blue has unfortunately already retired but the Teal Shimmer Trim is still available until the end of this month. After telling everyone at the retreat that my favourite SHIMMER TRIM IS RETIRING (Nooooooooo!!!)... I did show them how to paint white shimmer trim with watercolour paints to get matching colours, but its more fiddly than just grabbing it and sticking it on!  


This month is the LAST MONTH OF the Annual Expressions Catalogue. Go to my website or your consultants website to see all the exciting products available BEFORE THEY'RE GONE FOREVER!! (yes I'm still being dramatic - I don't want anyone to miss out!!!). 

Thanks so much for dropping by to check out my latest project, I hope you get inspired. I'm really interested to hear what you think about it, so I'd love you to leave a comment before heading off to the next stop on our Australasian Blog Hop which is Lauren Moore - CTMH Craftings.
  Come back to see me again soon.

Monday, 20 June 2016

Thin Cuts - CTMH Australasian Blog Hop

Welcome to our Australasian Blog Hop. We have all been creating with Close to My Heart's 
"Thin Cuts" Dies and coordinating Stamp sets. 

If you have arrived here from Maz Wood: Inky Fingers then you are in the right place. If you landed here another way, please join in by following the link at the end of this post. Follow the links, check out all the amazing ideas and eventually you'll come right back here to where you started. 

There are currently 4 sets of Thin Cuts that are currently available (see below).

I started with the Tickled Pink Thin Cuts with matching Tickled Pink stamp set and while I was cutting them I cut out extras of the A Bunch of Love Thin Cuts to use for other projects with the matching A Bunch of Love stamp set.

I wanted to make a pop up card and the steps below are how I did it. 


Below are the pictures of the stamp sets that perfectly coordinate with these two thin cuts. 


You put your thin cuts downward (all facing with the sharp edge down). I found the wings of the flamingo moved a little so I found the best way to keep them in place was with Washi Tape. (You can get this pear striped washi tape in the Ultimate Embellishments Bundle that is available in the Flash Sale today until Tuesday). 


For my Card I got a piece of White Daisy Cardstock cut to 8 inches x 4 inches. I marked the middle of the cardstock on the edges at 4 inches (You can use a pencil mark or a small crease at the edge of the card - DO NOT crease the card all the way across or your pop up card will be ruined - I'm not exaggerating {Smiley Face}). 

 When you are cutting the pop up card from any of the thin cuts you choose, make sure you lay only half of the shape across the centre line. You hang out the half you wish to NOT cut out the bottom of your cutting placement on your Big Shot or Cuttlebug (as shown above). 

 Above photo shows how the flamingo looked after it had been cut and folded. He almost looks like a dinosaur (Note to self: Dinosaur!!). I made it this size purposefully because it fits into our 5 1/2" × 4 1/4" White Envelopes, from the Value Pack. Also available in the Flash Sale Ultimate Envelopes Bundle (6-pack) available until Tuesday this week. 


The above shows how the flamingo looks printed in Pixie Exclusive Inks™ Stamp Pad
and Black Memento™ Ink Pad. The Memento Ink is because I was planning to use watercolour paints!
  

I loved using the Watercolor Paints and Waterbrush—Medium Round with blue water colour paints from the set.  

While I was waiting for the paint to dry I took a photo of the above lying down opened out. This is how I painted them. 

To finish off the cards I used 3-D Foam Tape to stick on the wings and extra flamingo and Black Memento™ Ink Pad to stamp the "You are Fabulous" sentiment. 

I was really happy with my end product and made 10 of them for our Consultant ten-fold swap at our Monthly Consultant Fun Day this month. 

Remember these Thin Cuts are only available until the end of the current Seasonal Expressions Catalogue (end of August 2016) from my website or from your Close to My Heart Consultant. 

Thanks so much for dropping by to check out my latest project, I hope you get inspired. I'm really interested to hear what you think about it, so I'd love you to leave a comment before heading off to the next stop on our Australasian Blog Hop which is Lauren Moore- CTMH Craftings.

Come back to see me again soon. Thank You!